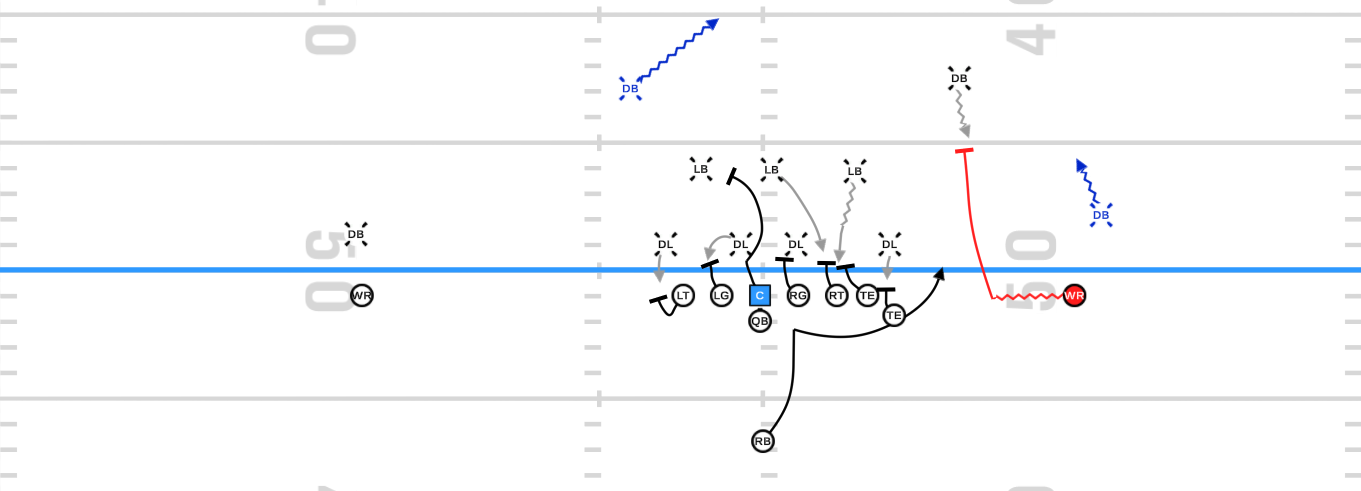
From a 4-3, 2-high look Tampa may have a WR slide motion towards the core and work inside towards the near safety.
The ball carrier drives downhill on snap, banging to the outside late.
OL are all zone-stepping to the field (away from the bounce), getting defense to flow with blocks.
Cracking Down Safety
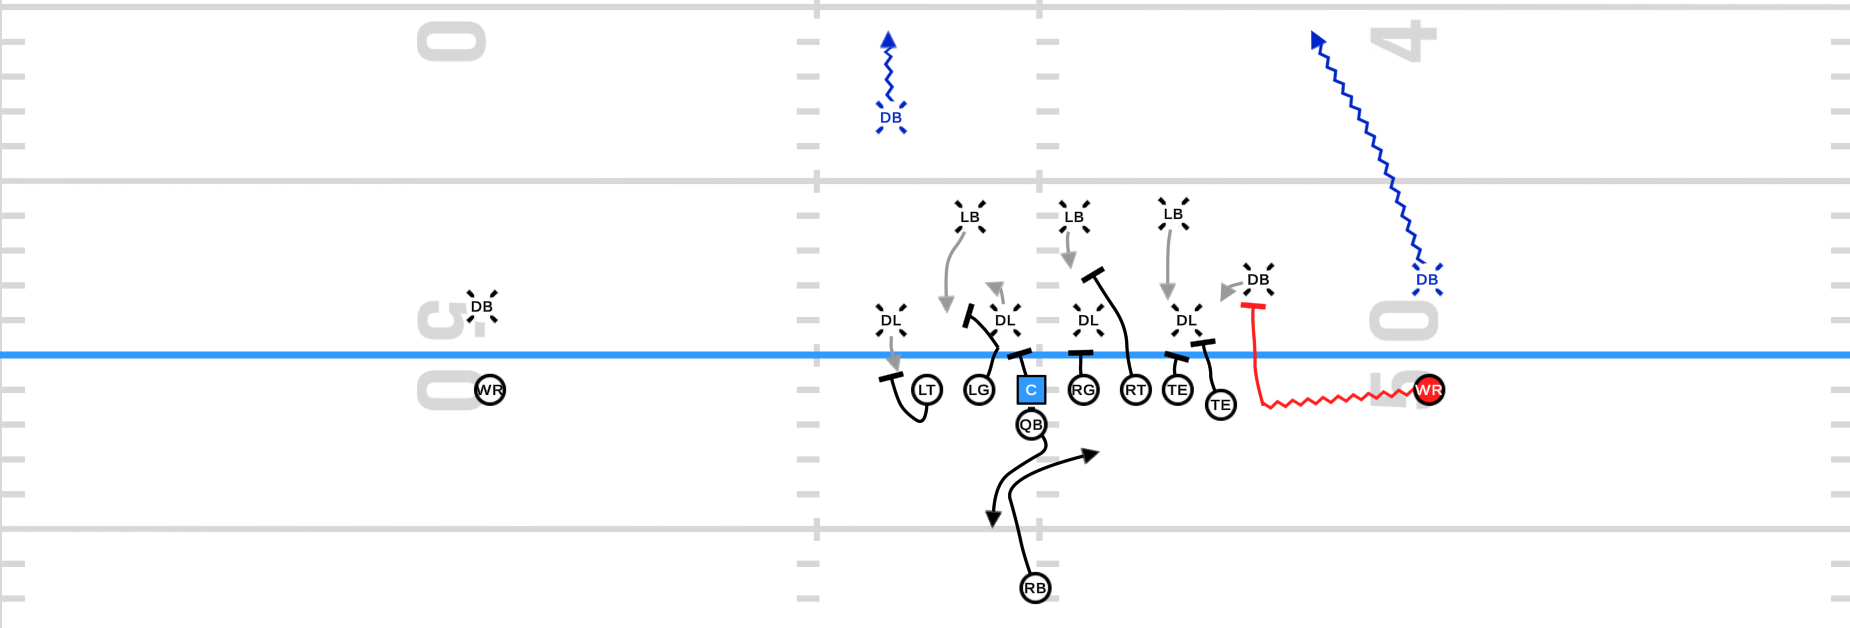
Against a 4-4, 1-high look, Tampa brings WR in motion to the core again and has him work to get square on the down-safety, who is flowing with the rest of the defense towards the counter footwork.
HB bounces outside hard and is put in a 1-on-1 in space with the CB who had bailed pre-snap on motion.
Inserting to Bring Safety Down
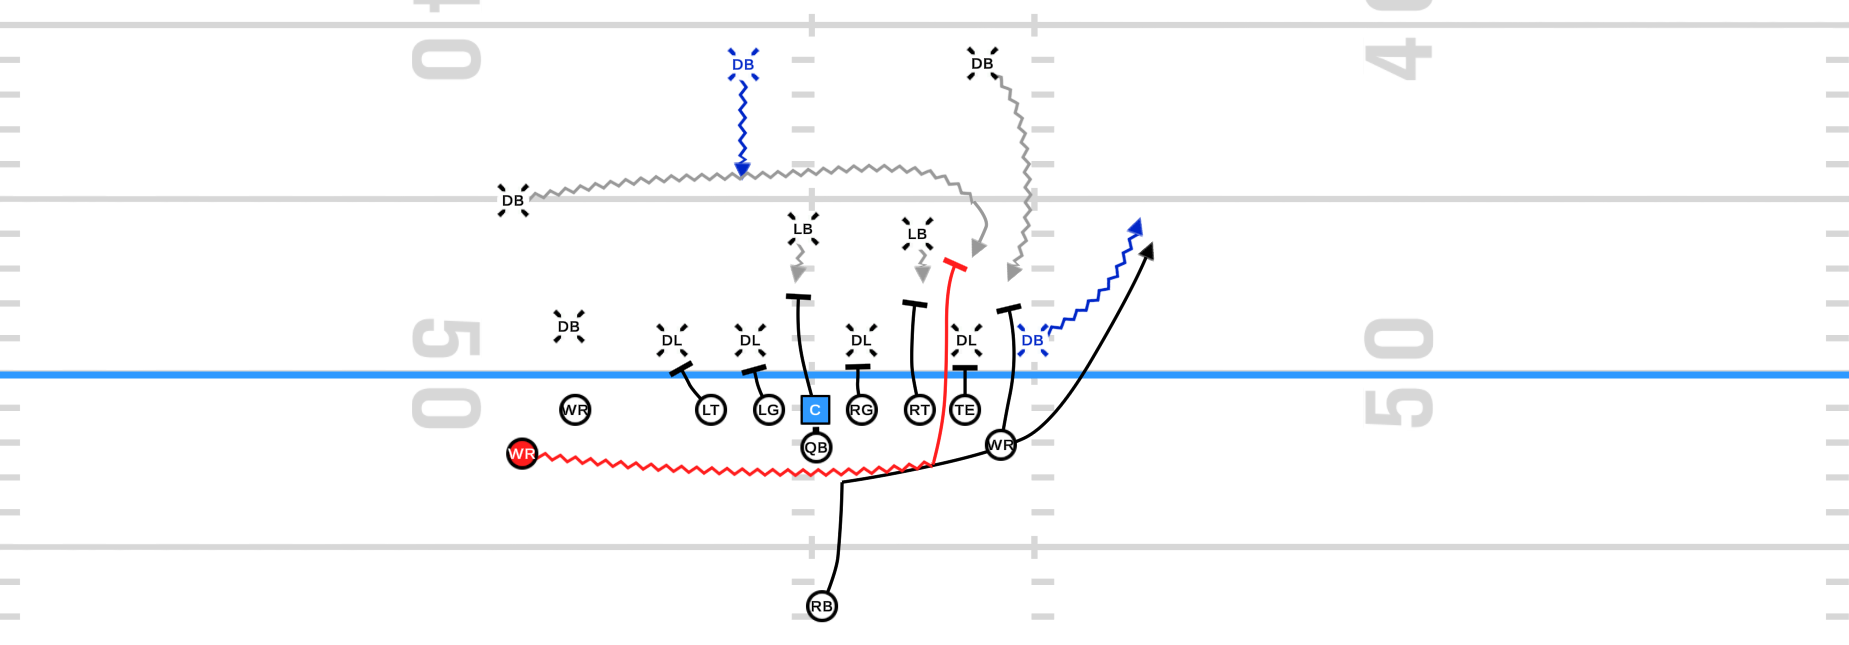
On motion CB sinks to defend pass while SS comes down to replace in run fit. This makes is much easier to for TB get a blocker on SS, while making it convenient to leave CB unblocked.
The runner again departs downhill, bouncing to the outside quickly to exploit the mismatch on the perimeter vs a lone cornerback.
Against a team looking to push routes deep down the field, a 3-high structure can provide great value. Tampa Bay saw good success with this against KC in the Super Bowl. See more details on a 3-high defense here.
It removes middle field open / closed reads presnap (from 2high and 1high looks respectively)
Adds flexibility in coverages. Particularly in top-down rotations.
Can align potential deep defenders at a better depth to stay over any deep routes from a speedy receiver.
Tampa played fivesnaps of 3-deep presnap looks.
Twosnaps of a 1-deep, 5 under STICKS coverage..
Two snaps of a boundary rotation cover 3.
One snap of straight cover 3.
Outcomes: 1 Int, 2 Inc, 2 checkdowns allowed.
Note TB played a bunch of 3-deep prevent calls at the end of the game, which we are not including here.
FILM
If you are not able to see the film here while on a phone, either open the page in "desktop mode" or open it on a computer.
1st Quarter, 11:34, 3&8 - STICKS (1-deep 5-under)
Boundary and Middle safety drop to hook/hole at sticks. Here we can see all 5 underneath defenders within 2yds of the 1st down marker. Nobody matches either vertical route up the middle. Compare this to the next play.
Here we see a great sample of the flexibility of a 3-high look. BCB and Sam (Ni) blitz both edges and are replaced in coverage by the outside safeties, while mugged backers drop out into the hooks at the marker. In coverage, note both corners playing top-down on the possible outside verticals, to make sure the single deep safety is not outnumbered as he was the prior clip.
2nd Quarter, 2:00, 1&10 - Straight C3
While not a standard 3-high look with the outside CB as 3rd high defender, it ends up playing like a standard 3-high with the Sam (Ni) here replacing the CB as flat defender. Pausing halfway into the play, you can see the distributions of the 3-deep 4-under.
3rd Quarter, 6:30, 3&13 - C3 Boundary Rotation
Boundary and Middle safety are dropping, while both CBs are taking deep 3rds from a backpedal on snap. With no vertical, a CB will continue to zone off to his deep 3rd to make sure he takes away any deep crosses. Boundary corner #24 here s pulled down a bit by the hunt route of #87, while #10 is running the deep cross behind him. #24 manages to get back and make a great play on the ball to cause a turnover.
4th Quarter, 6:22, 2&10 - C3 Boundary Rotation
Same rotations as prior clip. While not targeted, KC does run another deep cross aimed behind the boundary corner.
In their wildcard matchup against the Washington Football Team, the Tampa Bay Buccaneers utilized a series of plays featuring split zone actions, jet motions, and end-arounds to force the Washington defense to shift, generating a number of explosive play opportunities.
Using motions across the formation pre-snap, Tampa forces Washington's backers to push down and create mismatches or conflicts for the edge defenders.
Using split-zone actions (down-blocks and slices across from the TE), Tampa muddies and confuses the read for the secondary run-fitters (reading TE) and the backside DE (reading the down-block). This is followed with misdirection plays taking advantage of these muddied reads, attacking the edges of the formation.
Related plays not shown: 4 split zone run calls, 1 split zone play-action, and 1 jet sweep play action.
DETAILS
1&10, 1st drive of the game.
WR #81 (Antonio Brown) motions across the formation creates a 6 on 7 in the box, in favor of the offense.
This creates conflict for the slot defender, who has followed the motion and is now fitting the B gap from outside of the box.
One way teams alleviate this is by having the field DE shift tighter to the tackle and work into the B gap, or squeeze harder behind the down block to try and spill the kickout to the wider run defender.
1st&10, 2nd quarter
There is plenty of backfield action here, which quickly takes advantage of the defense.
HB swing action to the boundary, while the TE and #1 WR in the bunch are pulling around to the wide side of the field.
The O-line combined with the TE makes it look like split zone, which typically has the ball carrier hitting inside of the tackle box.
Reading split zone, the 9 defenders closest to the box take initial steps towards the center of the formation. DE #95 steps down hard behind the down block expecting to squeeze or get under any kickouts, and so the TE simply bypasses him and takes his block to the 3rd level unabated.
With the TE pulling, this creates a 4-on-4 box count to the playside. With the DE being skipped, the offense is gaining an extra blocker.
Worth noting: this play is ran while Chase Young is not on the field, to the side he typically defends.
2pt conversion, 2nd quarter
#81 jet motion across the formation causes backers to "pull the chain," leaving a defensive back to fit off of the DE on the edge.
DE #91 (Chase Young) jumps the B gap, forcing the runner to bounce outside to the free-hitting DB on the edge.
If the HB keeps his footing, this looks like it may be points on the board with the HB coming downhill fast on a DB in a 1-on-1 needing only 2 yards.
1st&10, 4th quarter
TE #84 goes on short return motion, followed by a pull giving a split-zone look. He then spins around in the backfield after a very short pull, and works back towards the wide side of the field.
Similar to the second clip, we can see all 10 players near the box step into the center of the formation, expecting split-zone thanks to the reads being created by the offense (OL down blocking, TE taking slicing action, and QB/HB fake).
Tampa had not run any two-man pulls this game, so the RG pulling up looks to me just like a way to replace the kick-out of the spinning TE, and seal out the backside pursuit of the disruptive Chase Young (#99).
The RT, C, and TE do a great job of working to the edge through the middle of the formation.
------------
Using frequent split-zone run calls, Tampa set up their misdirection plays to attack the edges of formations.
Using motions across the formation, Tampa created mismatches or tough fits for the Washington secondary.
From offensive snaps in weeks 1–4 of the 2020 NFL season: New England, Tampa Bay, Miami. Cutups at the bottom.
Disclaimer: this is an experimental breakdown. The goal here is to attempt to divorce some very general causes of negative runs from the specific defensive fronts, blocking, and run schemes. At least divorce as far as possible without losing all meaning and context. Leave a comment here or on reddit with some feedback.
Here we will look at some of the most common causes of run plays in the NFL resulting in +1 yards or less. Causes being addressed are listed below.
Unblocked Backside Edge Defender
Defensive End/Edge + Linebacker Gap Exchange on a Down Block
Zone Runs Against Bear Fronts
Tight End Blocking a Defensive End at Point of Attack