Showing posts with label Defense. Show all posts

Monday, August 9, 2021

Romeo Crennel Pass Defense: Part 3 - Man Coverages and Rules

This is part 3 of the Romeo Crennel 2010 defensive coverage series. This article will outline some man coverages and the rules within them, including vice/cone double coverages and funneling.

Man-free and 2-man are not included here. Man-blitzes will be in a separate writeup.

Part 4 will be a continuation of man-coverages, looking at more man-matched calls including C4 Quarters.

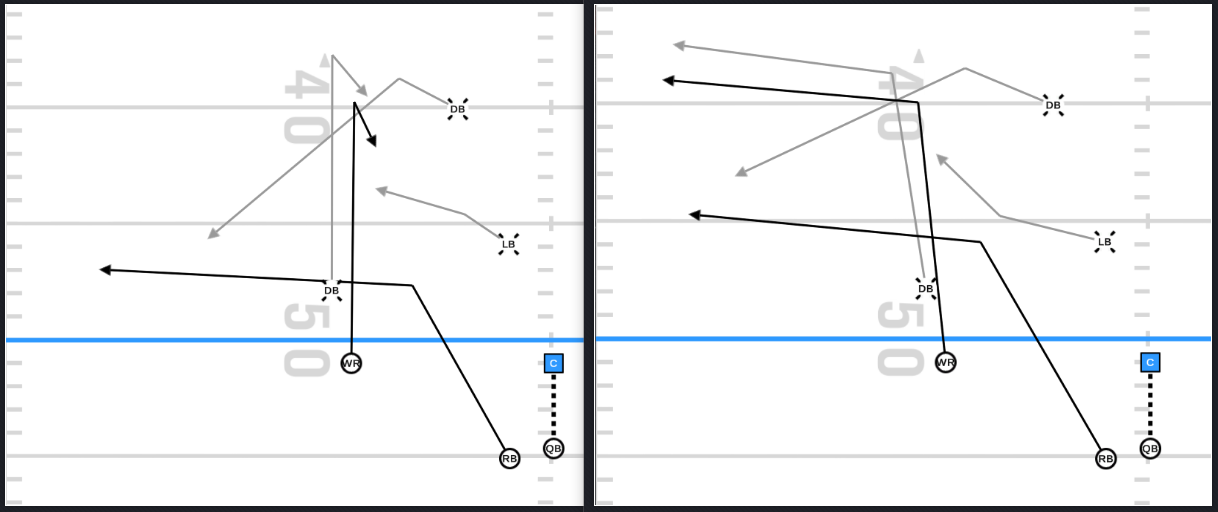
VICE - Double Coverage on #2


Man-matched coverage call. This is a coverage built to distribute stress by alignment. Having the backer aligned inside taking inside routes, and safety aligned outside taking outside routes from #2. 
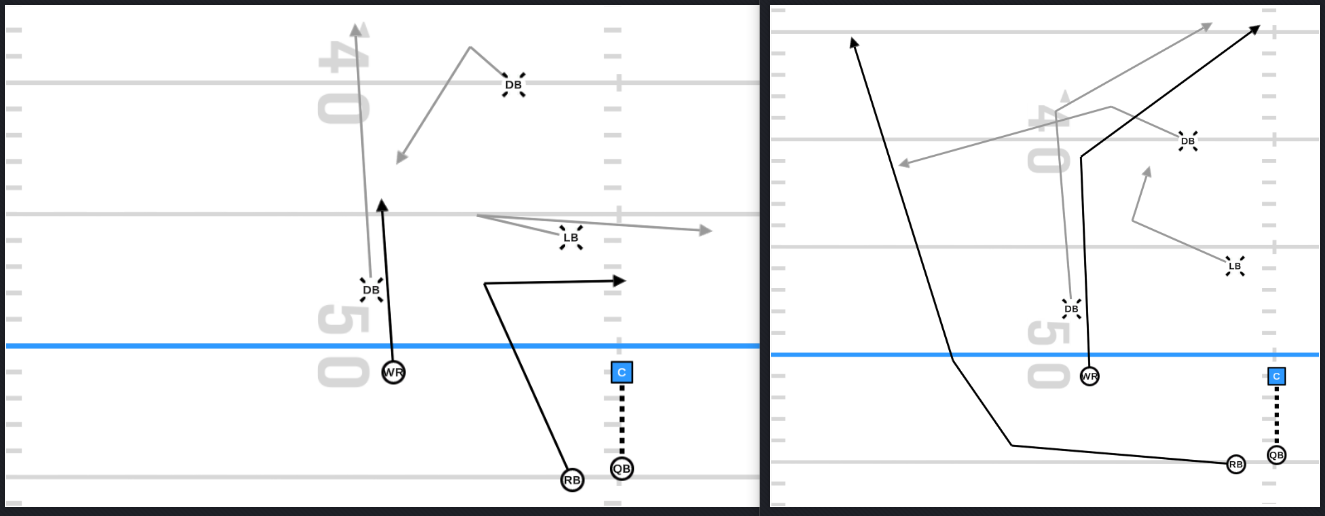
Vice Route Distributions

  • Cornerback: lock on #1, outside and on top of the route. Late help from Will or WS to the inside and under. 
  • Will: Cover #2 inside-out to 12yds (WS take #2 vertical). Carries #2 across formation on unders. If #2 breaks out, look to #1. 
  • Weak Safety: Cover #2 outside-in and vertically. if #2 breaks out, take him man. If #2 breaks under, rob the curl of #1. Take all of #2 vertical. 


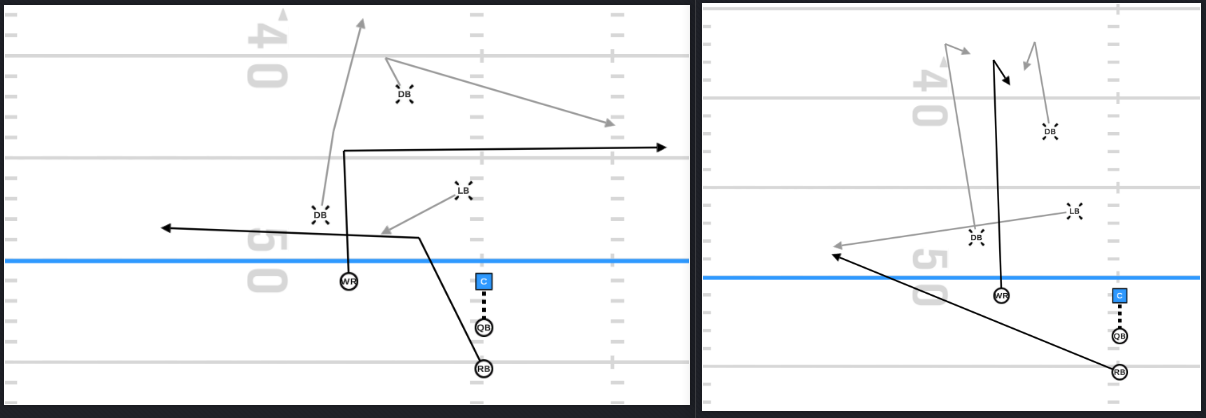
CONE - Double coverage on the #1 
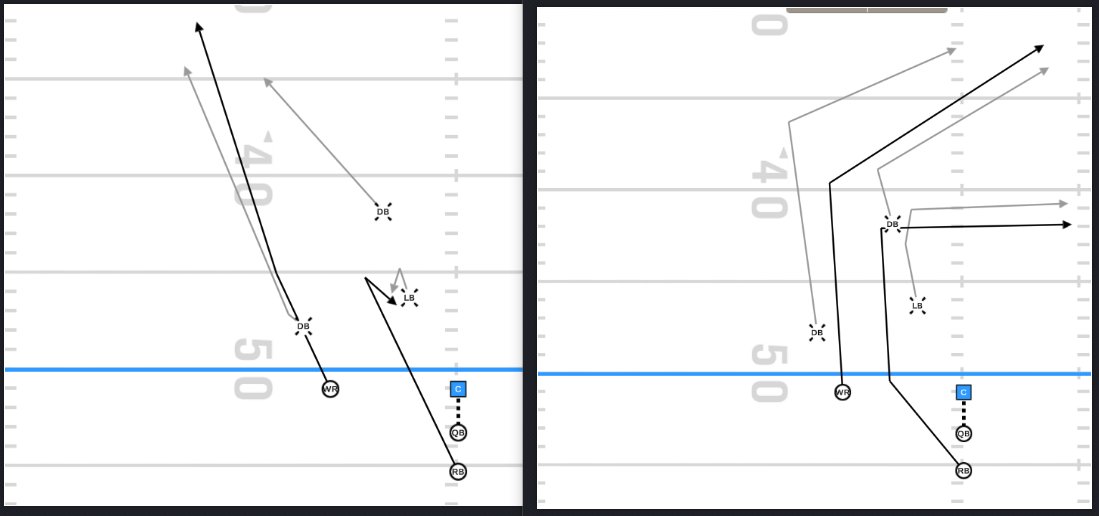

Man-matched coverage call. Technique used to double the outside WR in and out. Called against tight split #1. Run force changes based on release of #1.

Cone Route Distributions

  • Cornerback: Press #1 outside-in. Responsible for all outside and deep routes. If #1 under, get depth and play QB. 
  • Will: Cover running back man-man on everything. Expect no help.
  • Weak Safety: Read release of #1. Cover #1 inside and deep. If #1 out, drop to deep 1/2 and play QB.  

Cover 1 Funnel (3-4)
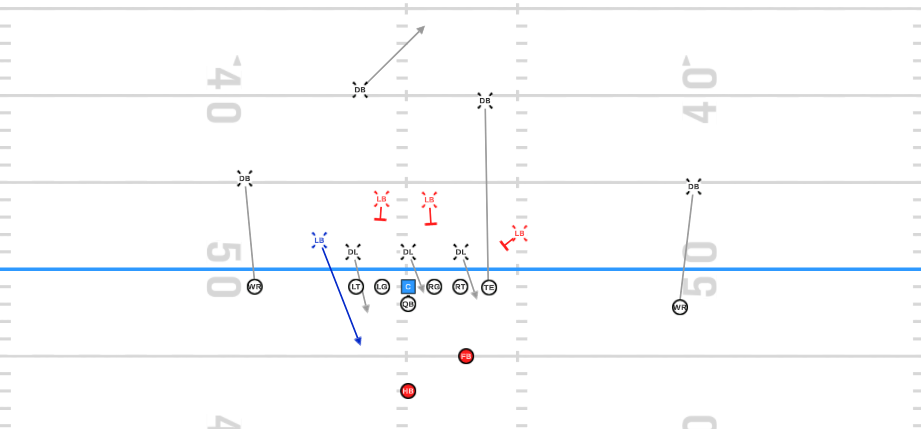

3 on 2 funnel, with 3 backers funneling the 2 backs. 
  • Man/Man coverage, with weak safety in the post and linebackers man-matching. 
  • The backside outside linebacker will be tagged to rush (Roy/Lee call). 4man rush call.
  • Vs 2 back sets, linebackers funneling 3 on 2 against 2 backs.
  • vs 1 back sets, linebackers funneling 3 on 2 against HB and TE.
  • Manned safety is free to align deep or come down pre-snap.

Funnel Technique


  • This coverage employs a 3-on-2 funnel, with three backers on two running backs, or an HB and TE. There are three base distributions. 
    • If both backs go STRONG, Sam takes first out, Mike takes second out, will sits in the hole
    • If both backs go WEAK, Will takes first out, Mike takes second out, Sam sits in the hole
    • If backs SPLIT, Sam takes the strong back, Will takes the weak back, and Mike stays in the hole. 
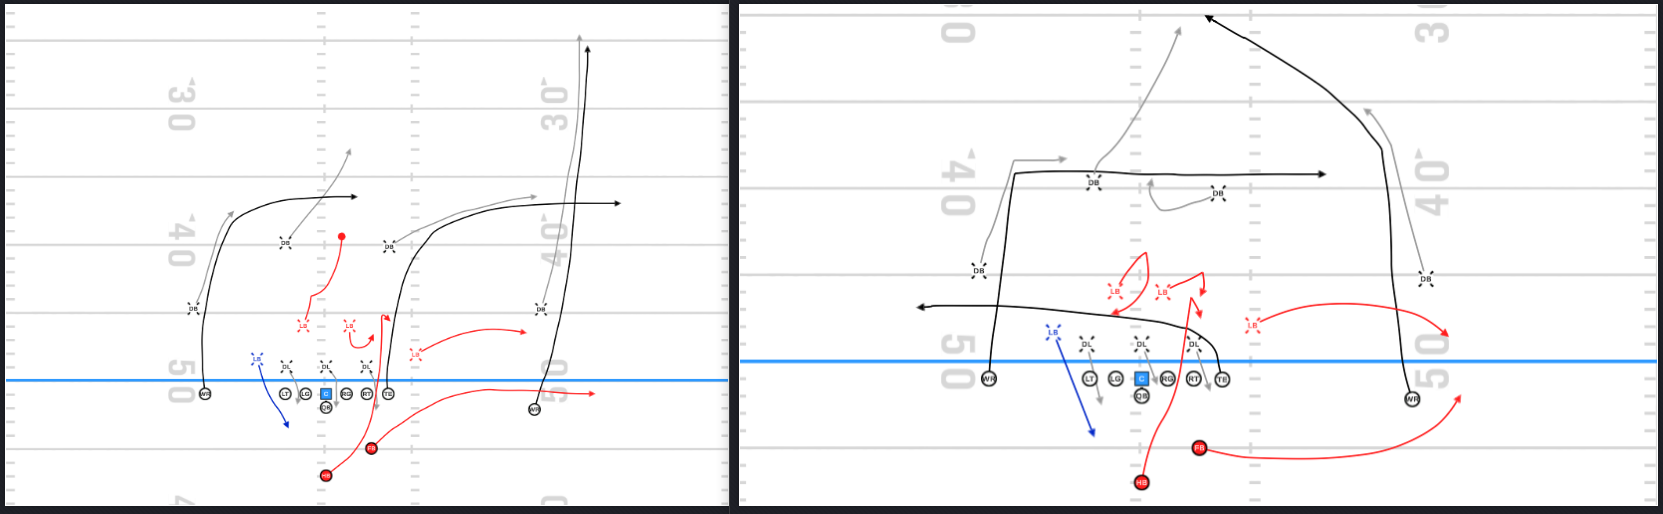
Funnel against LOAD FLOW (2 backs release strong)
    • If TE shallow, Will picks up TE and SS robs the in-breaker from the opposite side. (SS must see the Y picked up by Will before releasing)
    • If TE up or out, Will replaces Mike in low hole and hunts crossers.
    • If both backs release same side, the backers initially taking them will carry them everywhere. 

  • Load Flow Rules
    • Sam/Will
      • Take first back to my side.
        • If he goes shallow, release calling "under under", push to the hole. Opposite outside backer will pick up this release shallow if the 2nd back is not shallow. 
      • If both backs away, Push to the hole. Look for first crosser.
    • Mike
      • Take second back to my side.
        • if he goes shallow, release and look to the flow side for a follow crosser.
          • Think a release like a back coming out in the "down" and breaking across the formation, followed by an angle route. You are releasing the down back and picking up the angle. 


Funnel against SPLIT FLOW (1 back strong, 1 back weak)
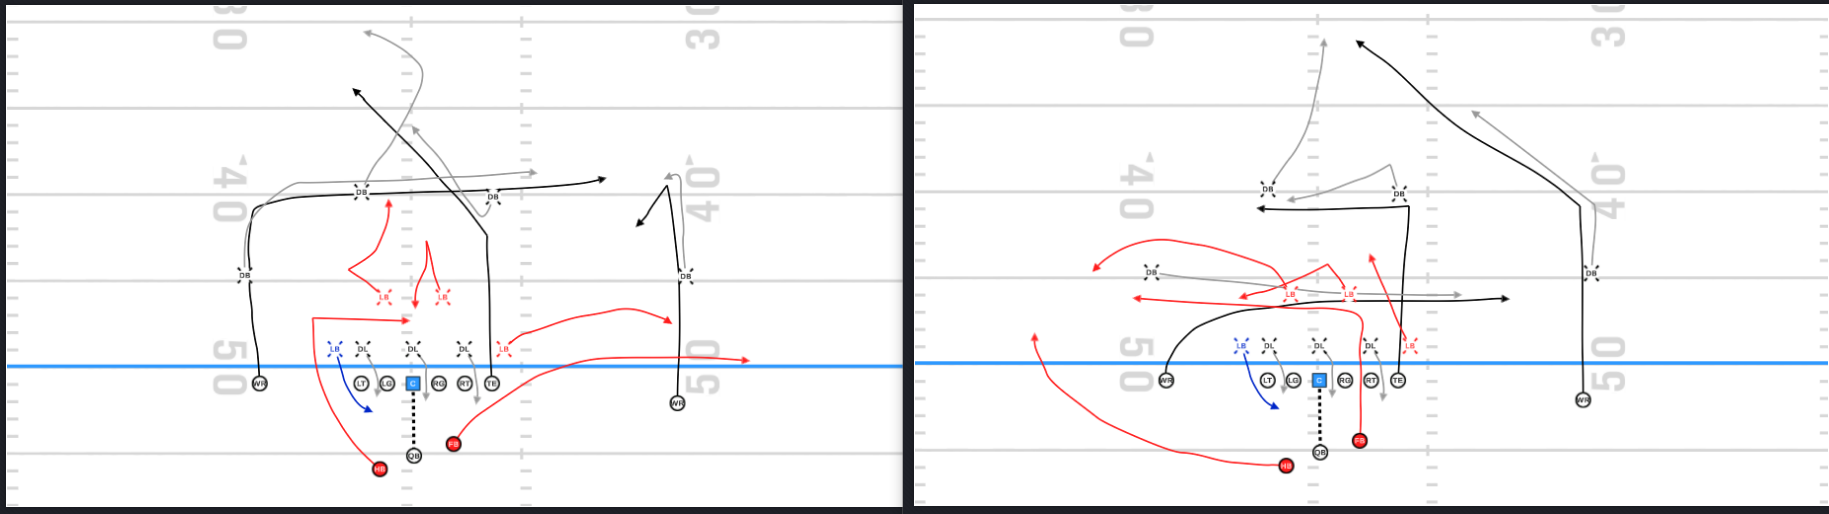
    • Mike takes first crosser across his face
    • Sam/Will are passing the first crosser and looking opposite for a return crosser. 
    • After distribution of backs, the free backer will prioritize cutting the TE.

  • Split Flow Rules
    • Will/Sam
      • First back to my side unless shallow (crossing). Release shallows.
      • If shallow released, check opposite side for first crosser coming my way.
      • If shallow released and no crosser, robot and cut the TE.
    • Mike
      • First crosser (Sam/Will call UNDER)
      • No crosser, robot and cut the TE


Monday, July 26, 2021

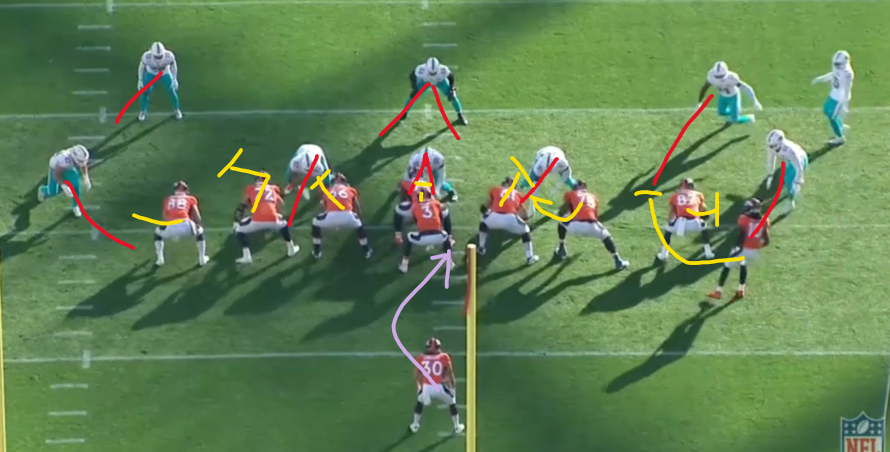
Amoeba Front - Miami Dolphins 2020

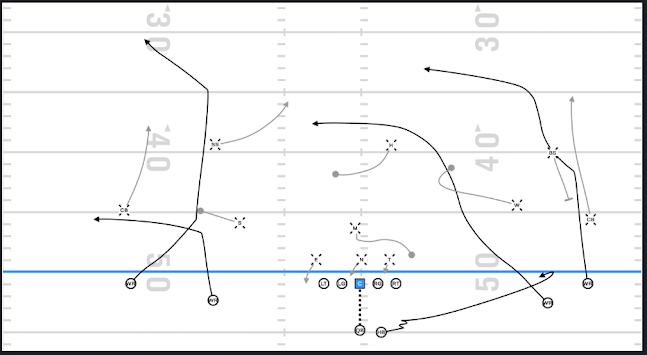
Call this front by any name. Miami has been running it fairly often, particularly as a 3rd down passing defense. In week 10 vs the Broncos, Miami called this 6 times, 5 of 6 on 3rd downs. 

Results of this call are:

1 INT

2 PBU

2 Allowed First Downs

1 Tackle short of the 1st


This front works well vs the pass thanks to the constant movement and shifting causing uncertainty in the QB and OL pass blocking call.

Typically Miami has their standard pass rushers in and does send them, but there is the possibility to run very light packages like the dollar to further hide who is coming and who is dropping. 

The dolphins often will run line twists or looping blitzes with this front, as well as overloading a single side of the line. 

The ability to drop or rush from various locations also lends itself to many different easily disguised coverages. 


1. 3rd&10, 1st quarter, INT

DOLLAR personnel. 4man rush, with a strong addon (sam-aligned player). Looks like a C3 variant. 


2. 3rd&9, 1st quarter, PBU

DIME personnel. 5man rush with strong addon (sam loops inside-out). C1 spy. 


3. 3rd&10, 1st quarter, 12yd scramble

QUARTER personnel. 4man rush, 3 strong. 3 deep 4 under. 


4. 3rd&5, 2nd quarter, 4yds

DIME personnel. 4man rush, strong slot blitz. C1 robber. 


5. 3rd&3, 3rd quarter, 15yd quick out

DIME personnel. 4man rush. C1 spy. 


6. 3rd&8, 3rd quarter, PBU

DIME personnel. 5man rush, Mike addon. C1 robber. 


Tuesday, July 20, 2021

Miami Dolphins - Run Fits - Quick Notes

2020 Week 11, vs Denver Broncos


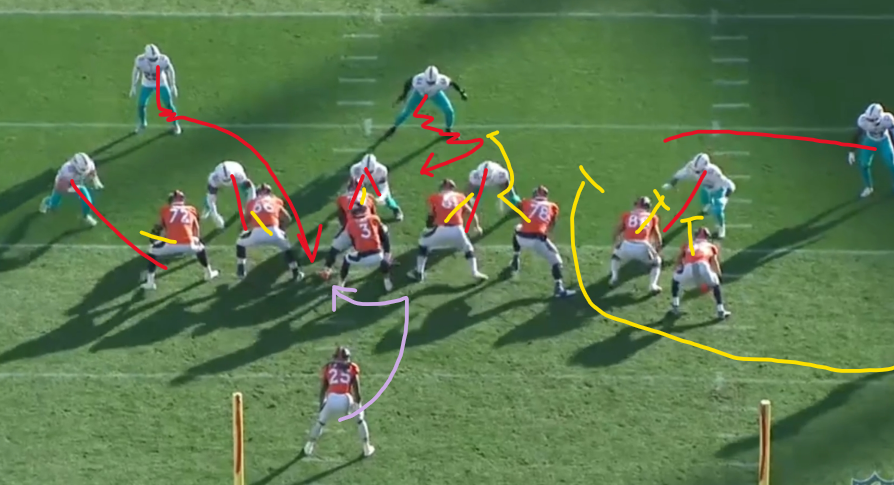
In this writeup, we are taking a look at how Miami used their DBs in the run fit. 

This is primarily in their 3-3-5, with OLBs on the line presenting a 5man front and SS in the box to the strength with the Nickle close to the box on the backside. The only LB not on the LOS is the Mike. 

This is not only snaps from this alignment. Also not all snaps in the game from this alignment.


Miami DBs have good impact when playing downhill between the tackles, getting to their gap, finding the ball carrier, and securing tackles. Miami's nose tackle in these plays also has very good impact. 

Problems begin to arise when the ball carrier takes an outside path, with lead blockers taking on the edge. 


See film cutups at the bottom of the page.


SOLID FITS

1. 

Mike is making the Nose right, with nose playing either A gap. The nose shows his helmet to the left, forcing the ball carrier to the right and then shedding the Center and getting hands on the ball carrier.

The blitzing down safety to the strength meets the ball carrier in the hole, beating WR insert block to the inside.


2. 

The Nickle to the backside plays patiently in the run, since the backside is fully gapped out and he is a +1. When the ball carrier heads to his side, the Nickle triggers down and meets the HB in the hole. 

Like the prior play, the Nose is staying square on the Center and threatening both A gaps. Nose shows his helmet to the right in the strongside A gap, and after the ball carrier bounces to the backside A gap the Nose sheds his man and again gets to the ball carrier at the line. 


3. 

TE meant to come up off his playside double and pick up #21 misses his block. #21 makes the tackle at the line. 


MISSED FITS

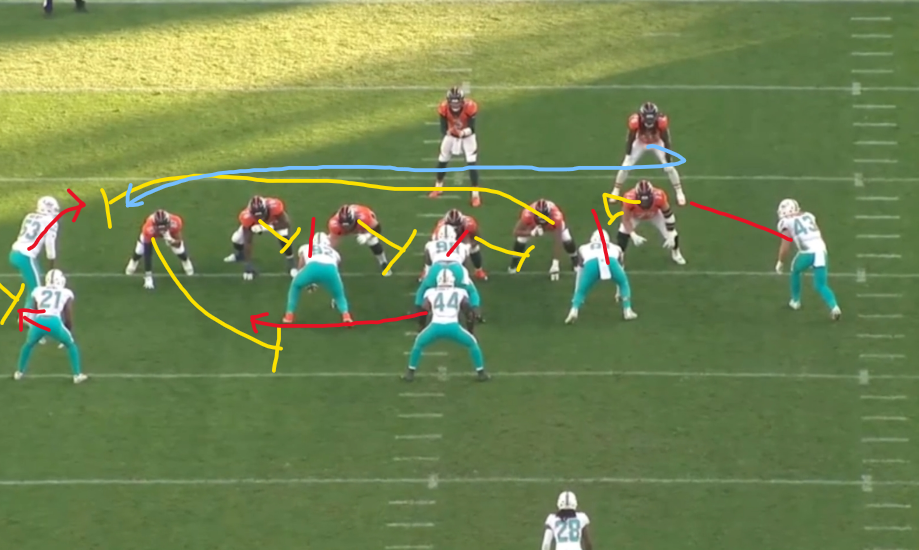
4. 

Double fold blocks with the Center pull here gives a +1 to the playside for the offense. Due to the front, there are no defenders able to adjust to the center pull.

Down safety #21 following TE motion is the target of the Center pull, and does get kicked out of the picture leading to an explosive run. 


5. 

TE forces #44 to go under the block, taking him behind the ball carrier. #53 gets kicked wide.

Down safety #21 gets over the crack block untouched, but gets beaten to the sideline for an explosive run. CB to the playside stayed on the crack runner and did not replace the edge fast enough, also gets beat to the sideline.


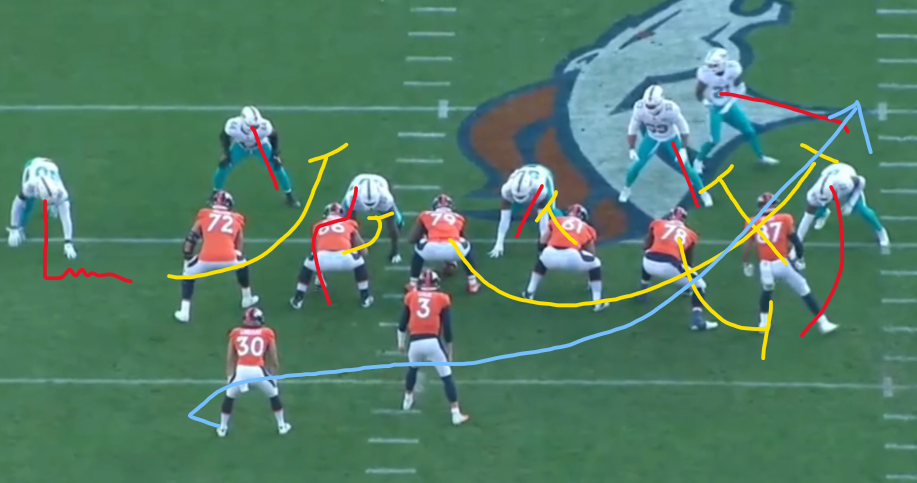
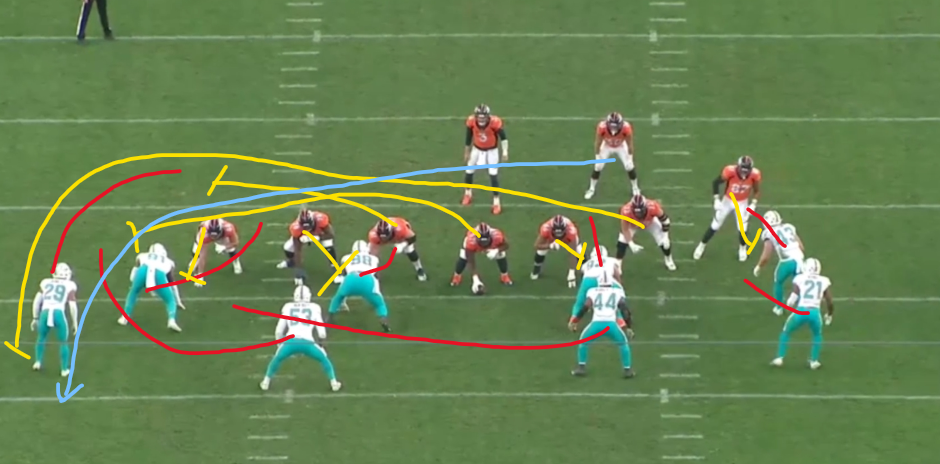
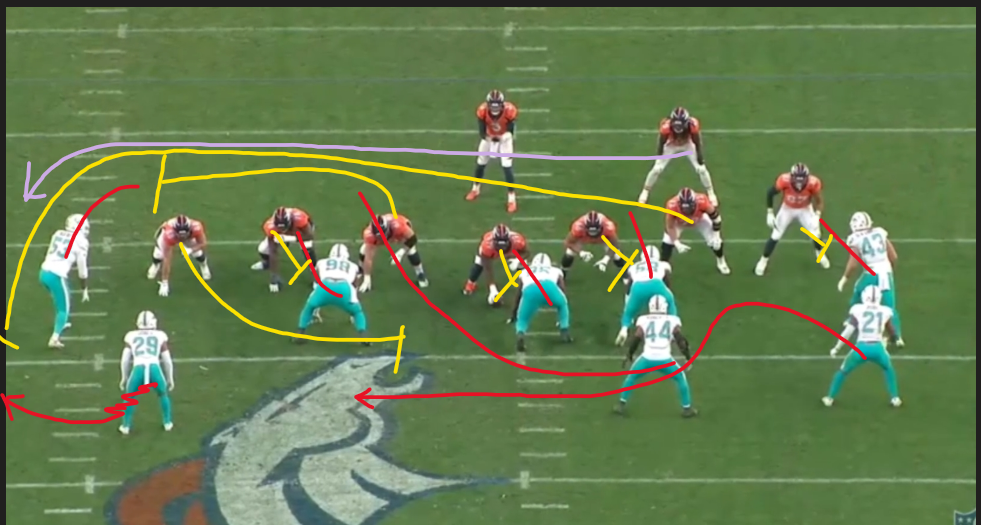
6. 

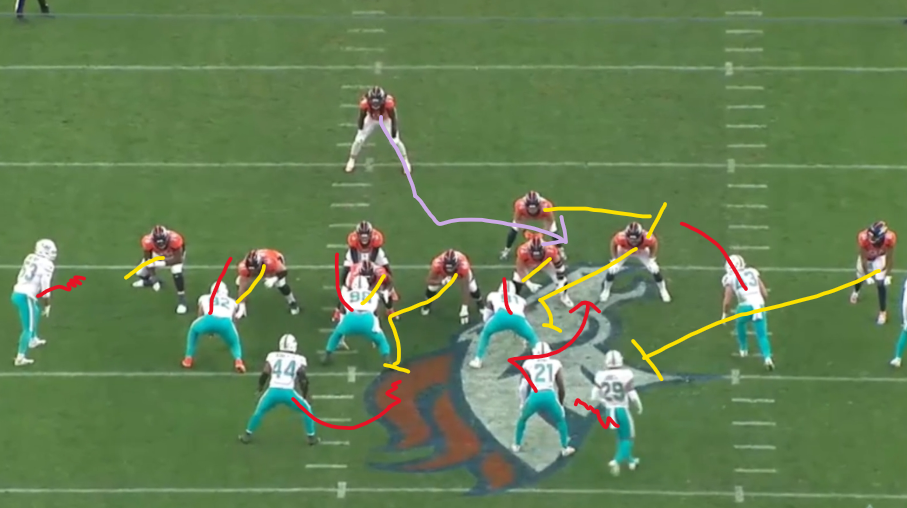
Denver pulls 3 blockers. Miami #44 and #21 would need to both gap down with pullers, but were both a step too slow. #44 misses 

#29 to the strength gets kicked out wide on his blitz. 


7. 

Playside edge gets logged by pulling guard.

#29 meets pulling BST on the edge., and gets tossed to the ground.


While sound against interior runs, Miami did have some struggles this game with runs to the edge, thanks often to the mismatches their alignment and personnel created against pulling linemen. See film of these plays below. 


Thursday, February 11, 2021

Tampa Bay 3-High Structure: SB 2020 Season (vs KC)

KEY POINTS

Against a team looking to push routes deep down the field, a 3-high structure can provide great value. Tampa Bay saw good success with this against KC in the Super Bowl. See more details on a 3-high defense here.

  • It removes middle field open / closed reads presnap (from 2high and 1high looks respectively)
  • Adds flexibility in coverages. Particularly in top-down rotations.
  • Can align potential deep defenders at a better depth to stay over any deep routes from a speedy receiver. 

Tampa played five snaps of 3-deep presnap looks. 
  • Two snaps of a 1-deep, 5 under STICKS coverage..
  • Two snaps of a boundary rotation cover 3.
  • One snap of straight cover 3.
  • Outcomes: 1 Int, 2 Inc, 2 checkdowns allowed.

Note TB played a bunch of 3-deep prevent calls at the end of the game, which we are not including here. 


FILM

If you are not able to see the film here while on a phone, either open the page in "desktop mode" or open it on a computer.

1st Quarter, 11:34, 3&8 - STICKS (1-deep 5-under)


    Boundary and Middle safety drop to hook/hole at sticks. Here we can see all 5 underneath defenders within 2yds of the 1st down marker. Nobody matches either vertical route up the middle. Compare this to the next play.


1st Quarter, 5:22, 3&11 - STICKS (1-deep 5-under Dbl outside blitz)


    Here we see a great sample of the flexibility of a 3-high look. BCB and Sam (Ni) blitz both edges and are replaced in coverage by the outside safeties, while mugged backers drop out into the hooks at the marker. In coverage, note both corners playing top-down on the possible outside verticals, to make sure the single deep safety is not outnumbered as he was the prior clip. 


2nd Quarter, 2:00, 1&10 - Straight C3


    While not a standard 3-high look with the outside CB as 3rd high defender, it ends up playing like a standard 3-high with the Sam (Ni) here replacing the CB as flat defender. Pausing halfway into the play, you can see the distributions of the 3-deep 4-under. 


3rd Quarter, 6:30, 3&13 - C3 Boundary Rotation


    Boundary and Middle safety are dropping, while both CBs are taking deep 3rds from a backpedal on snap.  With no vertical, a CB will continue to zone off to his deep 3rd to make sure he takes away any deep crosses. Boundary corner #24 here s pulled down a bit by the hunt route of #87, while #10 is running the deep cross behind him. #24 manages to get back and make a great play on the ball to cause a turnover.


4th Quarter, 6:22, 2&10 - C3 Boundary Rotation

 
   Same rotations as prior clip. While not targeted, KC does run another deep cross aimed behind the boundary corner. 

Saturday, February 6, 2021

Iowa State: 3-High Safety Defensive Structure - Introduction, Aligning, and Coverage Calls

A handful of college programs over the last couple years have been  implementing a 3-high structure as an additional tool in the toolbox alongside zero, 1-high, and 2-high shells. Iowa state has been one of the early adopters, running a 3-high structure regularly alongside their 3-4 Hybrid Nickel. 

KEY POINTS

  • Core Rules

    • 3-down front.
    • Mike/Will in the box typically. Sam coverdown often.

  • Goals of the Structure

    • Encourage run with a light box read. Stop run with aggressive middle safety (H) and overhang fits.
    • Stop the RPO with overhangs.
    • Prevent deep shots with pre-snap look. 3-Deep takes away MOFC/MOFO read pre-snap.
    • Match gap creation across the formation with fits from deep safeties.
    • Utilize multiplicity in 8th coverage man. Rotating coverages, blitzing into a 7-drop coverage, inverting coverages. 

  • Alignments

    • Safeties typically 8-10yds off the LOS.
    • ILBs typically 2-3yds off heels of DL, over A or B gaps.
    • Sam is pretty much always coverdown or apexed outside box.
    • 0tech nose in most fronts.

  • Run Fitting

    • 3-down line are added on to by inside backers, with the playside backer becoming functionally a 3tech in the run. 
    • Box players are spilling to the run-fitting safety.
    • In run, the missing backer is replaced in the fit by the H (or BS, by formation). Safety fits to the playside edge generally. Misdirection can cause problems for these fits at times. 
    • Against Y-Off, Sniffer, and FB sets, H and BS are able to match gap creation across the formation from depth.

  • Pass Rushing

    • Base rush is 3-down slanting to a side aiming to spill the QB out of the pocket in a single direction
      • Mike will often add-on to the rush on a delay, shadowing QB to the spill side. 
    • Other common call is to have DL rush central gaps looking to break the pocket inside-out, with Mike playing same role as above. 

  • Multiplicity

    • With a 3-down front and 3-high safeties, Iowa St. can call a drop-8 coverage on every snap. 
      • This allows any of the 8 droppers to blitz, and maintain the integrity of a standard drop-7 coverage distribution.
    • From 3-high, Iowa St. calls rotations and inversions of their coverages often. Corners, safeties, and overhangs will exchange assignments frequently. C1/C2/C3, Tampa, Quarters, and mixed calls are all on the table. 

ALIGNING and COVERING 

Depending on formation, Iowa State will play both split field coverage calls as well as full-field calls. 


3 RECEIVER SIDES

TRIO (3 split)

1. Cover 0. Man across the board, with BS/Sam sharing RPO rules. To the QB eyes hangs in coverage (Sam), and to the QB backside inserts to fit the run (BS).


2. Essentially a poach call, but the 3rd safety plays the role of poacher from an alignment to the strength, instead of from the backside in a 2-high shell. H takes the vertical of #3 while the #1 and #2 are covered with a 3-over-2 quarters call. 


3. Cover 1. H & SS man up to let backers play aggressively. Still trying to encourage short passes with depth of alignments. 


4. Tampa 2. Underneath defenders collision receivers before zone turning and gaining some depth. 


5. Cover 3 Boundary Rotation. H is hanging in the hole closing the seam, and driving down on ball thrown. Field CB is midpointing verticals of #1 and #2. 


6. Cover 2 H-man. One of the unique features of a 3-high is the ability to erase a man from the coverage, and still maintain drop-7 coverage distribution. H eliminates the #3 from the zone coverage, and Iowa State ends up with balanced 3-over-2 coverage to both sides. 


TREY (TE attached)

  • Iowa State aligns 3-over-2 to the split-out WRs, with a safety and a backer stacked 1-2yds inside the #2. 
    • Backer is either hanging to take away RPO, or folding into run fit. This depends on QB eyes to him/away from him, and backfield action. 
  • The middle safety (H) is likely to be put man/man on the TE, fitting run on TE block. 
Rarely see Trey formations in the film I have access to. Both examples have QB eyes to the Sam. Sam is hanging and defending RPO before triggering to run play. 


2 RECEIVER SIDES

SLOT (2 split receivers)

  • Iowa State makes a point to end the distribution with a 3-over-2. One of the main benefits of having 8 possible defenders in coverage is you can align/end the coverage with a numbers advantage look as long as you use the right RPO rules. 

1. Cover 2 Invert (Tamp2 Invert), mirrored. Safety pushes out to #1 right now, middle safety pushes to the seam/curl, mike drops to the hole, and CB bails fast to midpoint #1 and #2. 


2. Tampa 2. Mirrored. Starts as a drop-8 rush-3, with the mike spying the QB and blitzing on a delay.


3. Cover 3 Boundary Rotation. 

PRO/HBK (TE/HBK and split receiver)

  • Safety and Corner play similar to how they play over a single-WR side (next section). The main difference is a backer or the H (middle safety) alignment depending on TE location. 

1. Corner run support (cloud). 3-over-2. Full-field call is C3 with the 3-high all dropping.  


2. Safety overhanging/run support (sky). Inversion of the previous technique. 


3. Against tight set "wing" looks, Iowa State aligns 4-high by bumping a cornerback to depth. Coverage is 4-man 4-under, with the unders playing run-first and the H/SS following TE/FB on gap-creation across the line from depth (pulls/kick-outs). 


SINGLE WR SIDE

  • Pre-snap look always puts 2-over-1.
  • Safety to the single side typically aligns 6-10yds deep, apexed between WR and EMOL. 
  • Corner alignment is flexible, typically matching the technique and split rules in relation to the safety.
    • When safety is 6yds deep, CB typically 5yds deep aligned inside eye. 
    • When safety is 8-10yds deep, CB may align outside / press. 
  • Nearly always playing aggressive to the run on single-sides.


1. Corner blitz. Safety will take #1 vertical or zone off unders.  


2. Safety blitz. Coverage call here is Cover 2 with the middle safety pushing over from the strongside to the backside deep-half, and the BCB collision #1 to the outside and sinking under the vertical. 


3. CLOUD call. CB is force and playing fast to the run. Can aggressively collision #1 while reading backfield action. Safety is taking all of #1. 

4. SKY (or invert) call. Safety is reading backfield action and triggering fast to the run. Corner takes all of #1. Must stay on top of all #1 routes. 


NUB SIDE (TE only)

  • Depending on opposing team / expected run schemes, the edge/force player can be swapped between CB and Safety. 
    • One player will align LOS, 1yd outside TE and fight any reach block and trying to keep outside arm free, maintaining the edge and forcing runner inside no matter what. 
    • Second player will align 6-7yds deep, head-up on TE, fitting the last inside gap before the edge on run. 
  • No film of pass plays from Nub sides / coverages.


Tuesday, November 24, 2020

Romeo Crennel Pass Defense: Part 2 - Covering Empty

Romeo Crennel in 2010 was bringing essentially two calls against empty, with adjustments for sub packages. One being a Tampa 2 variant, and the other being a cover 0 man blitz. 


STRETCH (FLEX)


This is Coach Crennel's Tampa 2 call vs empty. Stretch is called with base personnel. Flex is the call for sub 3-4 personnel. 

Alignment notes: Mike (low hole) can align as 9tech vs an attached TE, or hipped off the OT vs a detached receiver.

Coverage

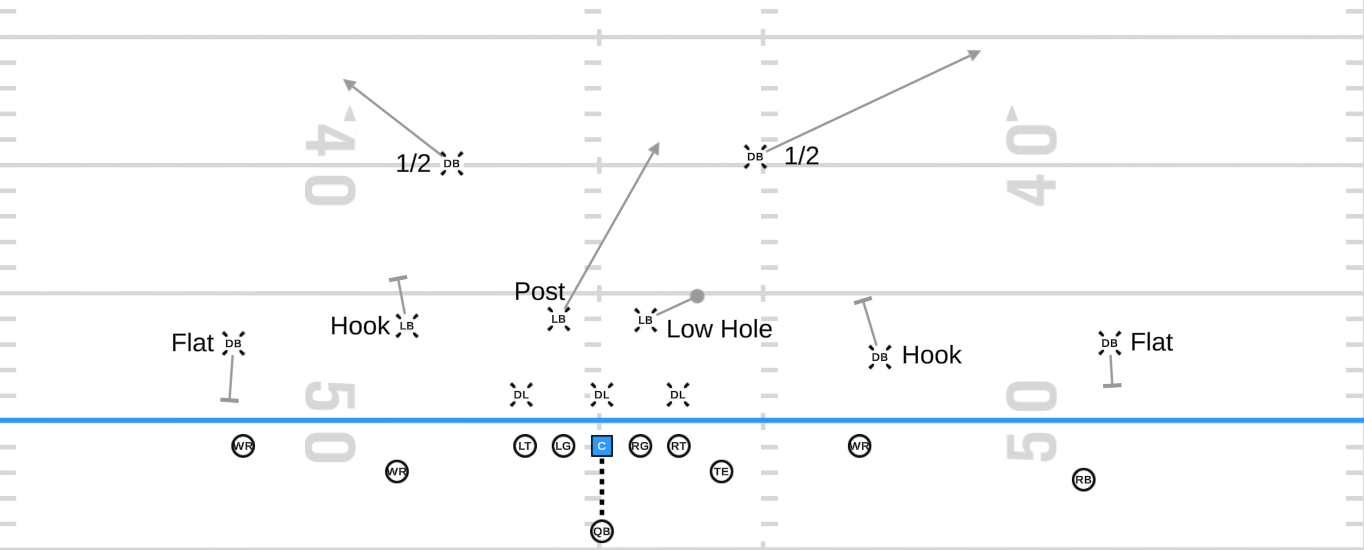
  • Flat (CB) - outside the numbers, covering all outs and comebacks. Carry WR to the seam before releasing. Keep eye on #2 breaking out. 
  • Hook (Ni, Jack) - Covering outside the hashes, and not going beyond the numbers. Take 1st in-breaker, and deliver to the Rat (low hole). 
  • Low Hole/Rat (Mike) - This is the extra coverage gained when rushing 3 instead of 4. Typically opens to the #3 receiver side. Jam any crossers, read QB, depth is around 8-12 yds. 
  • Post (Will) - Opens to most dangerous side determined by game plan / personnel. Closes the post to any vertical routes (between hashes).
There are no explicit rules on how to deal with a 4th or the rare 5th vertical with the only three assigned deep players (safeties and will).
  • Some coverages would have CBs take #1 vertical if #2 is not OUT in the first ~5yds. 
  • May be playing to have Safeties and Post defender midpoint over top of all verticals and defend them that way.

RAIN (FALCON)


Rain
Falcon

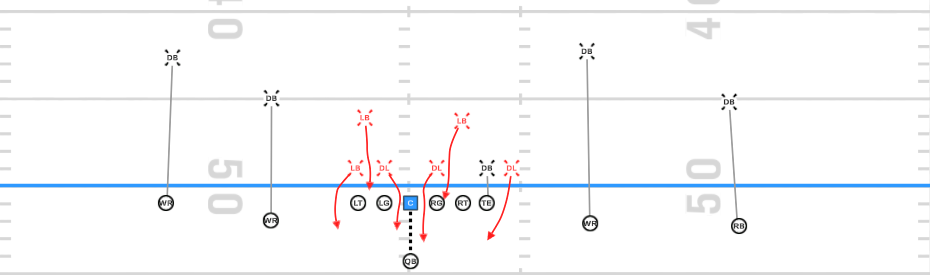
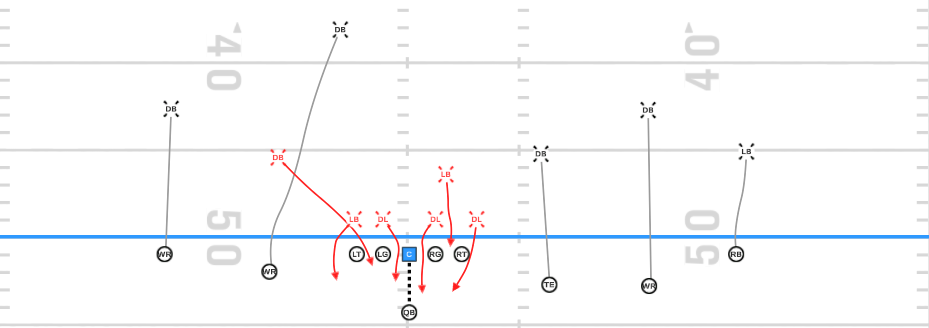
Rain (Falcon) is a check vs empty, man coverage across the board with a 6man pressure. 

Front

  • Defensive line slides to the formation strength (TE here, or 3 WR side), and the backside backer (Jack) becomes the DE on the backside. The front is aligned EVEN. 
  • Depending on offensive line slide, either Mike or Will may drop into coverage (if they get a slide TO).
  • Vs attached TE, the frontside DE takes the point and the Sam (Ni) will come down and press the TE inside. If TE blocks out onto the DE, DE will man him and Sam (Ni) will blitz. 
Coverage

  • Coverage matchups will be determined by game plan or base rules. 
  • The coverage is man/man and locked on all motions. If motion ends in the backfield, the defender will match box location. 
In part 3, we are outlining some base man coverage calls, as well as some of Romeo Crennel's core man coverage principles. 

Saturday, November 21, 2020

Romeo Crennel Pass Defense: Part 1 - Terms & Definitions

This is based on the 2010 KC Chiefs defensive playbook, which can be found online. 

This is part 1 of a (??) part series. In this first part, we are outlining the core terms of Coach Crennel's coverages during his time at Kansas City in 2010. This is to establish concrete definitions to some of the base terms before getting into the coverages themselves.

After the first few parts of this series going over coverages and rules, we will look at the 2020 Texans film and see how concept have carried over to Romeo Crennel's current team. 


ZONE DESCRIPTIONS


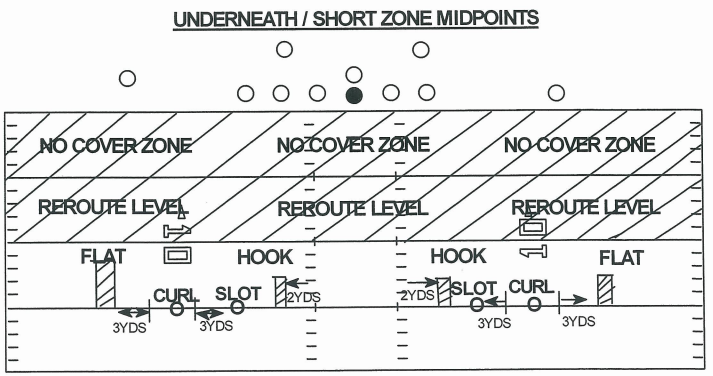
UNDERNEATH AND SHORT ZONES
  1. Flat - 12 to 15yds, midpoint 3yds outside numbers
  2. Curl - 15yds, midpoint on numbers
  3. Slot - 15yds, midpoint 3yds inside numbers
  4. Hook - 12 to 15yds, midpoint 2yds outside hash
  5. No Cover - Behind LOS, up to 5yds beyond LOS
  6. Reroute Level - 5 to 12yds, where receivers must be rerouted or patterns matched

Other Terms

  • "Hold the Curl" - Tells curl defender to hang in curl zone as long as needed to prevent a pass.
  • "2nd Man Thru" - Refers to second receiver running through an outside zone (curl or flat). Defender responsible for that zone will play the 2nd man all the way. 


INTERMEDIATE ZONES
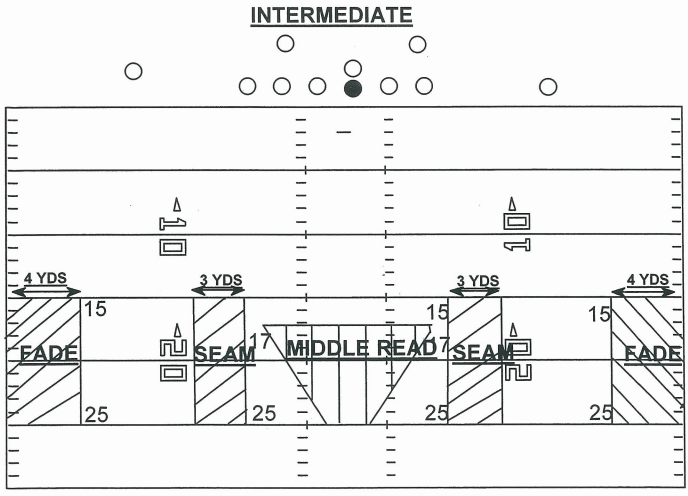
  1. Fade - from sideline +4yds inside, 15-25yds depth
  2. Seam - from inside of numbers +3yds, 15-25yds depth
  3. Middle Read - Basically between hashes, 17-25yds depth (cover 2)

Other Terms

  • "Hold the Seam" - Tells seam defender to hang in the seam as long as needed to prevent a pass.
  • "Carry the Fade" - Tells cornerback to sink with the receiver through the fade area.


DEEP ZONES (thirds and halves)

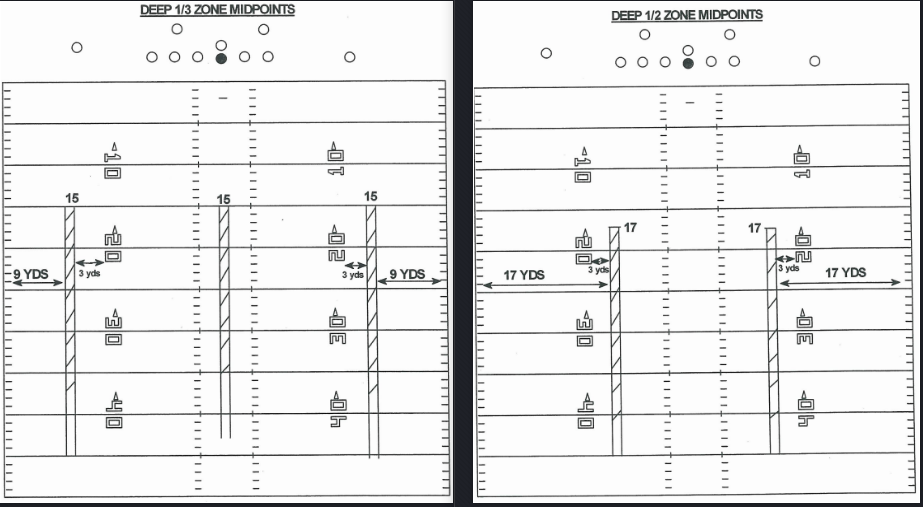
  1. Deep 1/3 Zone - Covers 1/3 of field, from 15yds to end line.
  2. Deep 1/3 Midpoints - 9yds from sideline, and the middle of the field.
  3. Deep 1/2 Zone - 1/2 of field, from 17yds to the end line.
  4. Deep 1/2 Midpoint - 17yds, 3yds from inside numbers and extending to the end line.

In part 2, we will look at coverage calls vs Empty sets. 

Saturday, October 31, 2020

Sacks VS the Miami Dolphins, Weeks 1-6

Sacks VS the Miami Dolphins

    Taking a look at some of the causes and factors in each of the 10 sacks during Miami's first six games. We can also look back at problems, similarities, and differences in protection and sacks between R. Fitzpatrick and T. Tagovailoa after he starts a few games. 

Full film cutup is linked at the bottom.

Thursday, October 29, 2020

Defensive Fronts: The Wide Front


Defensive Fronts: The Wide Front

Generating Pass Rush Pressure From The Wide Front, Across The NFL.

Click here for cutup of wide front snaps

Matched Box Wide Front. Only backer in box (49) matches HB.

KEY POINTS

  • This front is called strictly on anticipated passing downs. Called on 5% of all snaps sampled for this article, but more than 20% of 3rd downs. Nearly all on 3rd&4+.
  • The wide front is a 4-down front, with center and both guards uncovered. (Tackles 4i/4/5, Ends 7/9 techniques)
  • Advantages of the wide front are in creating four possible 1-on-1s (OTs, OGs), removing much of the impact of the Center sliding to either side, and opening space with wide alignments to be attacked with line games.

Disguising Tampa 2 - NFL Defenses


Disguising Tampa 2 — NFL Defenses

Film of these disguises in action is linked at the bottom.

The What.

While this article won’t get into too much detail of base Tampa 2, the basics are:

  1. Two-deep zones, typically covered by safeties in a two-high shell.
  2. Pole runner, typically a linebacker, covering the middle of the field, between the hashes.
  3. Four underneath zones. Two CBs playing sink-flats, two LBs playing hook-curl zones. CBs may be carrying #1 WRs vertical to help deal with possible 4-verts.
  4. Typically the low middle is vacated by the pole runner (blue zone circled above). Some teams will drop a DL into this zone off the line.

Disguising Tampa 2 typically comes from either disguising the players responsible for covering the two-deep zones, or disguising the pole runner.

Negative Run Plays in the NFL


Negative Run Plays in the NFL

From offensive snaps in weeks 1–4 of the 2020 NFL season: New England, Tampa Bay, Miami. Cutups at the bottom.

Disclaimer: this is an experimental breakdown. The goal here is to attempt to divorce some very general causes of negative runs from the specific defensive fronts, blocking, and run schemes. At least divorce as far as possible without losing all meaning and context. Leave a comment here or on reddit with some feedback.

Here we will look at some of the most common causes of run plays in the NFL resulting in +1 yards or less. Causes being addressed are listed below.

  1. Unblocked Backside Edge Defender

  2. Defensive End/Edge + Linebacker Gap Exchange on a Down Block

  3. Zone Runs Against Bear Fronts

  4. Tight End Blocking a Defensive End at Point of Attack


UNBLOCKED BACKSIDE DEFENDER