Handful of plays I watched recently and wanted to note down. Either old youtube videos or recent games.
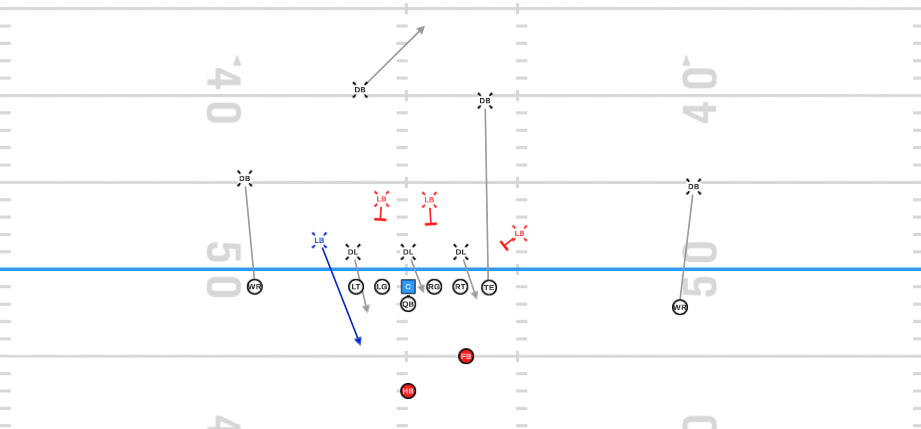
1. Fake Power Screen Away
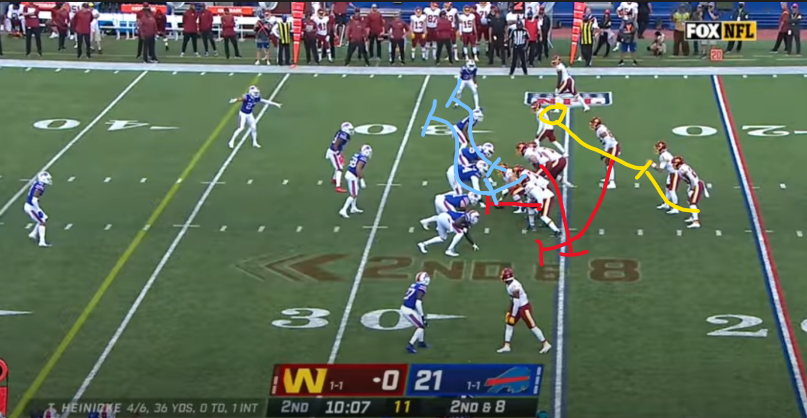
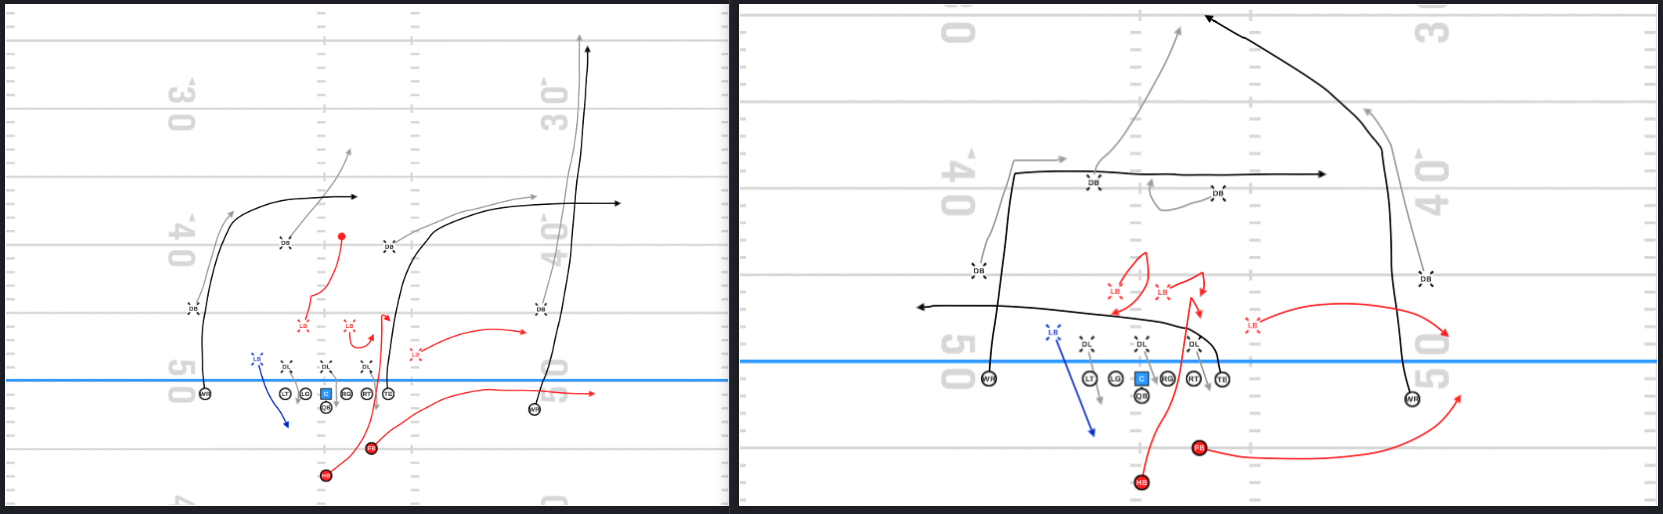
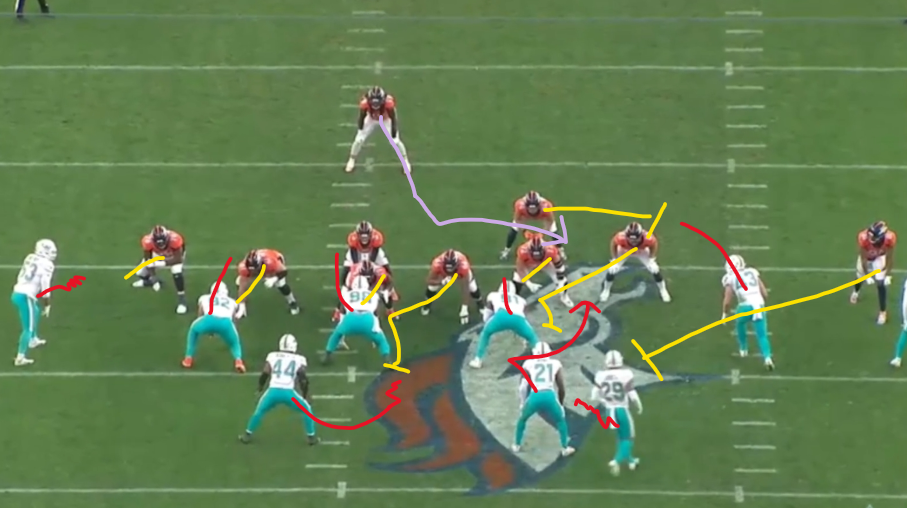
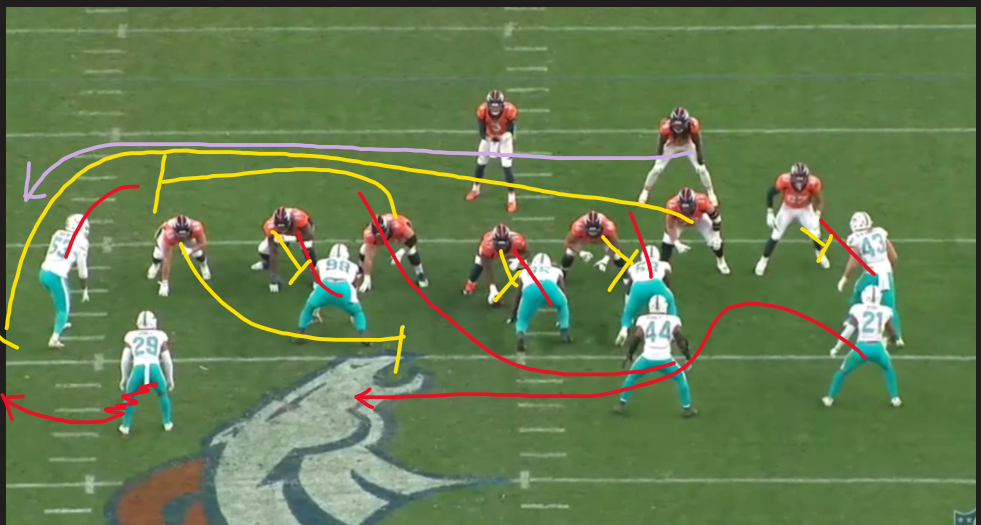
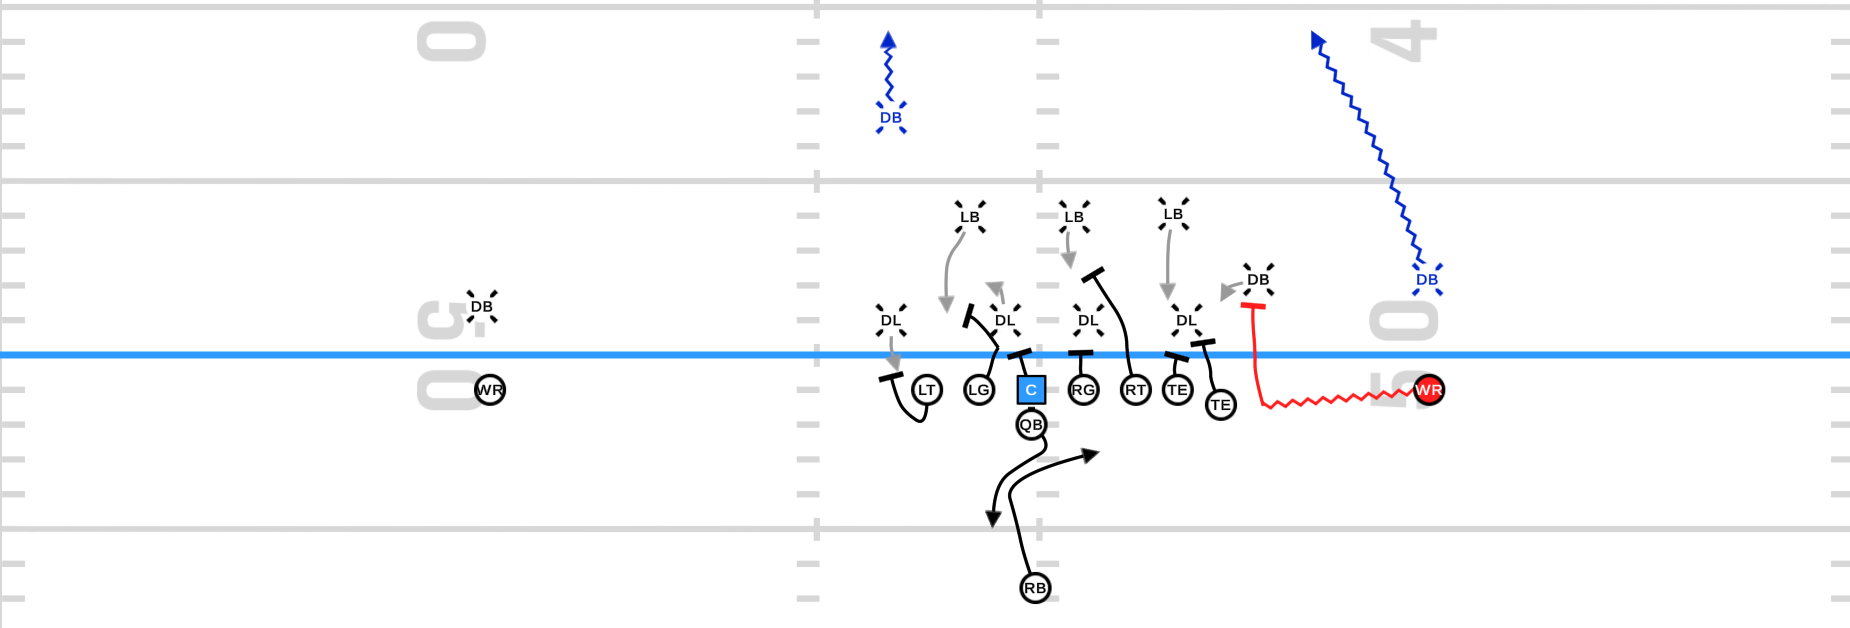
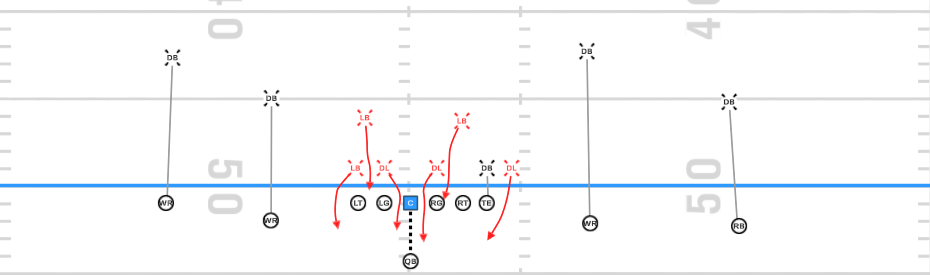
The fake same side power action by the Sniffer and OL has the LBs pushing away from the screen, creating favorable angles for the linemen getting out to block for the screen.
Faking same side power with Sniffer lead and RG kick.
LT, LG, C all block down but they make sure to stay on the LOS, to avoid getting downfield before the screen is thrown.
LG and C take a 1 second count on their block, then shed out to the screen.
HB fakes like he is picking up the Ni blitz after the PA, then olays and goes for screen.
WRs run off the underneath coverage.
2. QB motion spinout
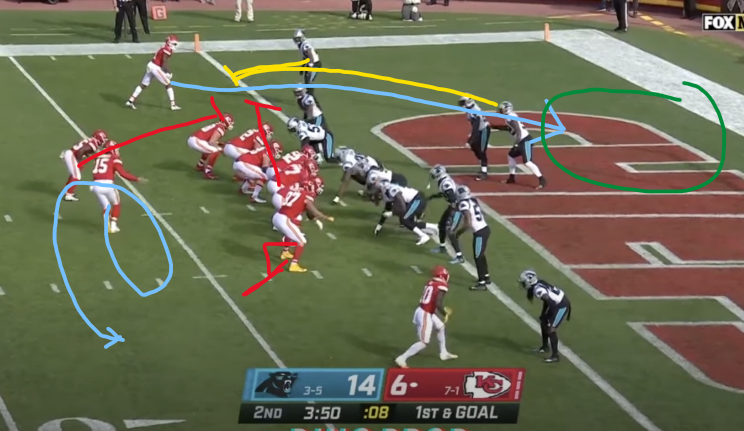
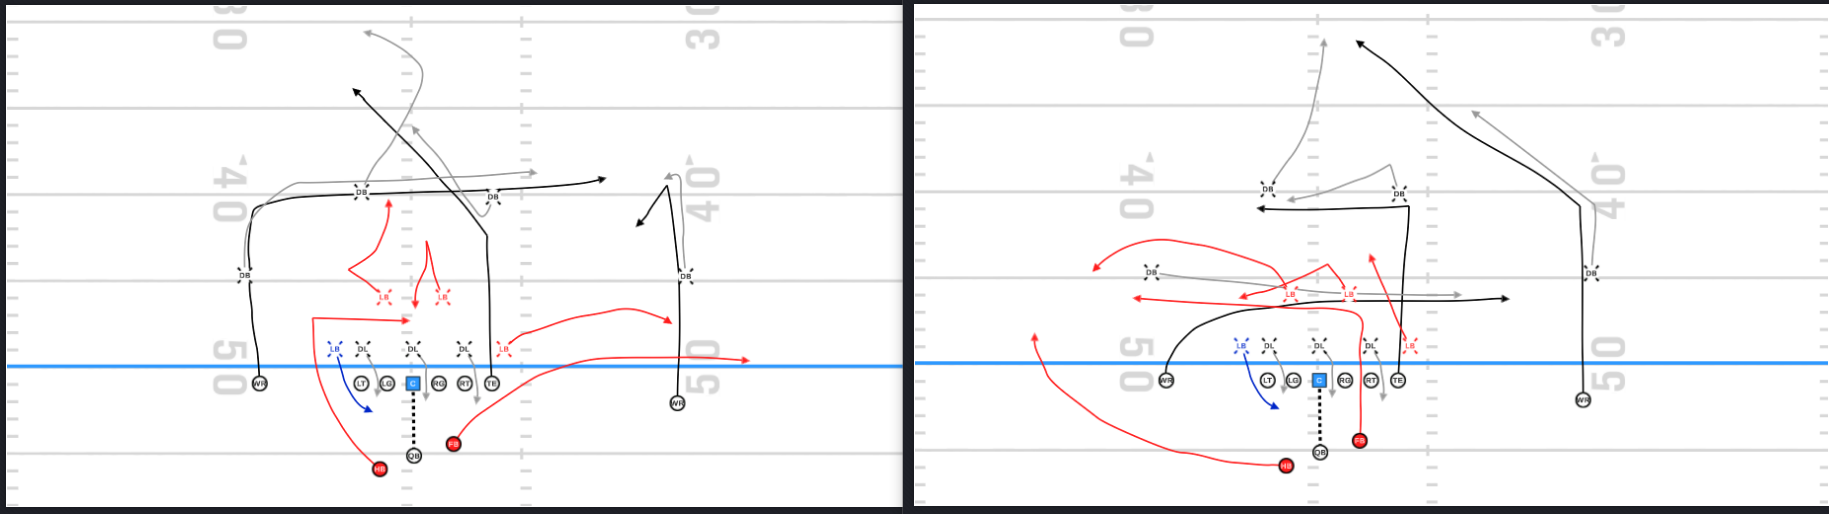
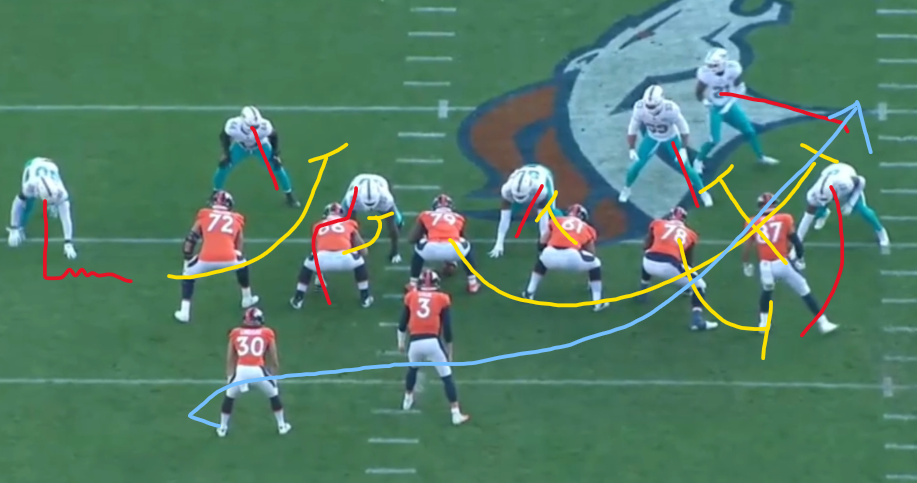
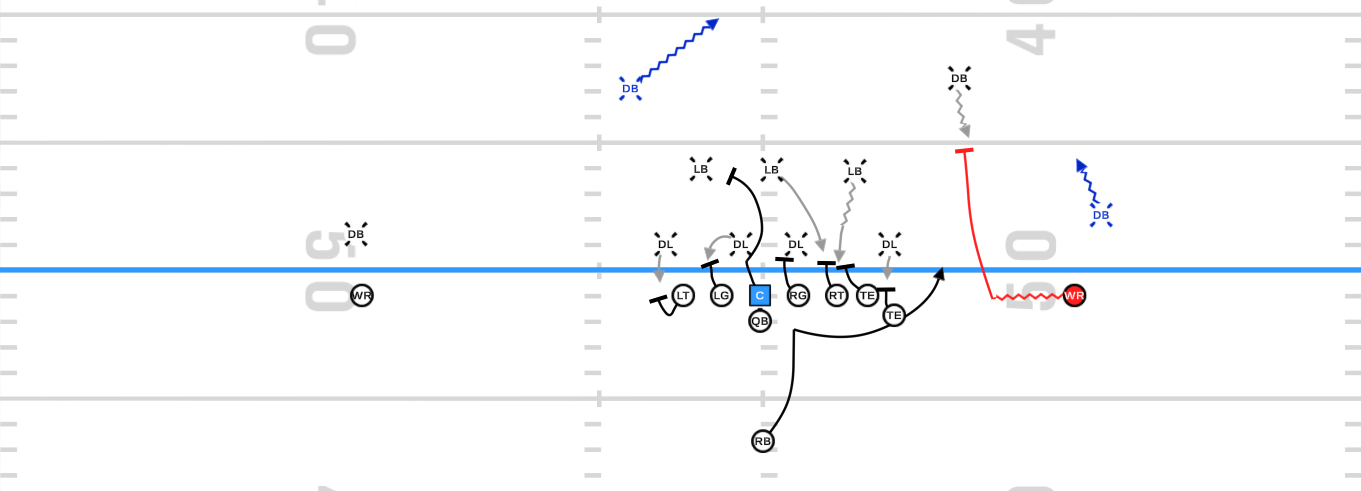
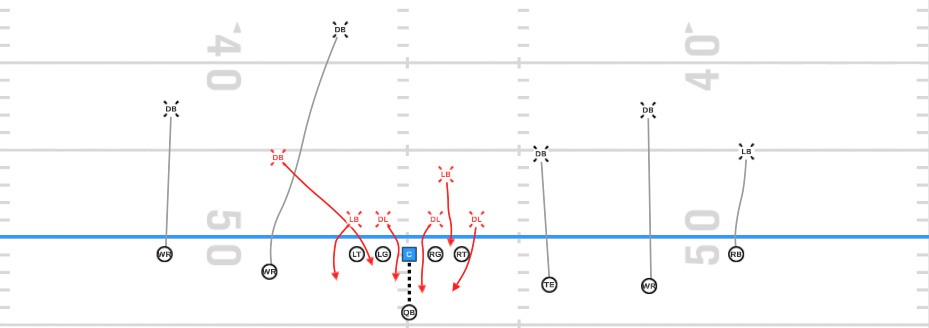
The QB taking the snap with speed to the boundary, as well as the offensive line blocking down and the HB leading to the edge, all encourage the line backers to flow boundary. This opens a window for the crosser when the QB spins out.
QB steps to the field, then at a run back towards the center takes a snap in the gun (think jet motion). QB spins out to the field after taking the snap.
Offensive line zone blocks down the line, with HB lead making it look like QB zone lead.
TE hinging on the backside to seal the edge for the spinout.
LBs flow with the backfield and OL actions, and CB steps down to set the edge, putting them all out of position against the crosser.
3. Punt - Jet RPO
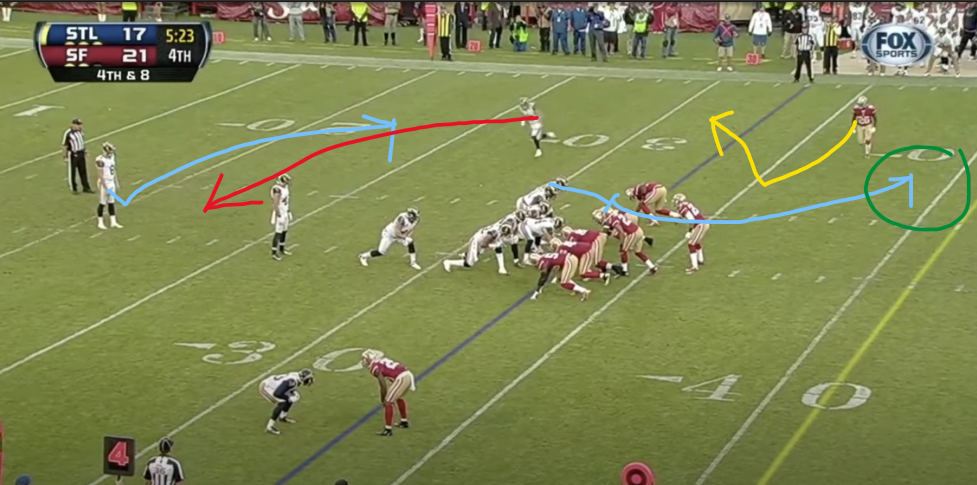
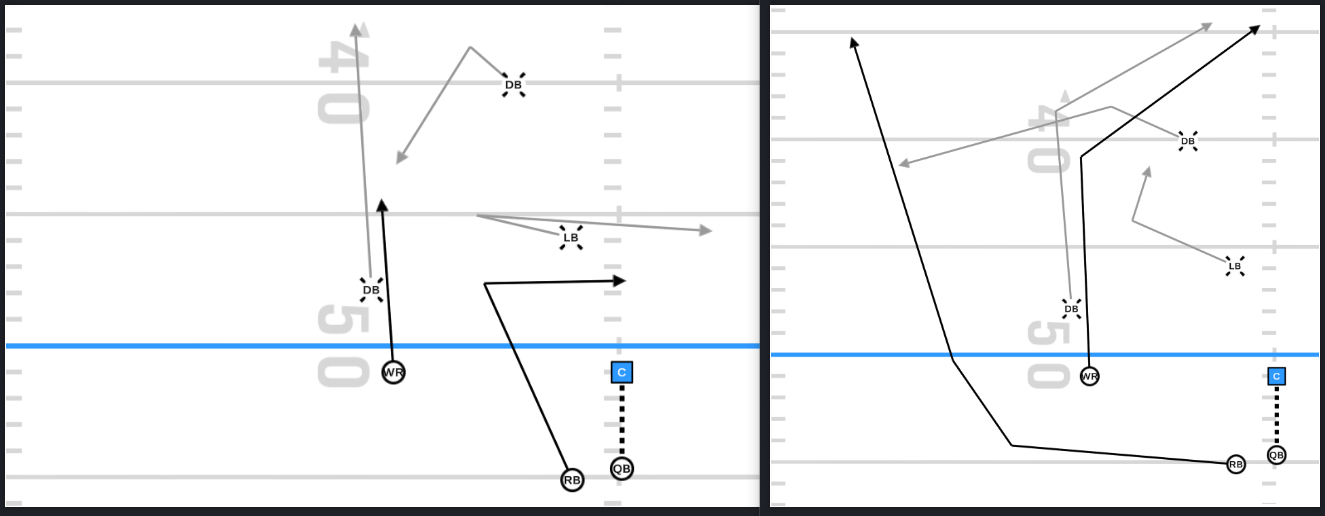
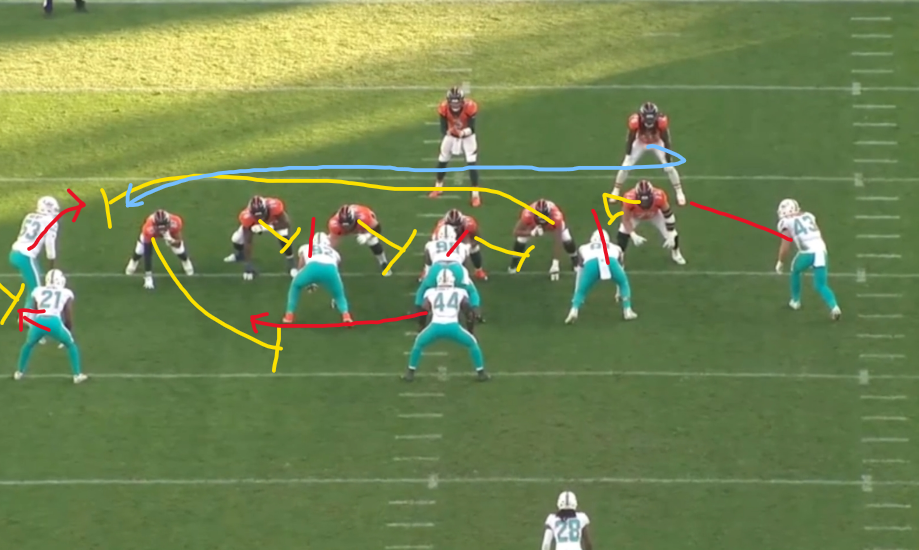
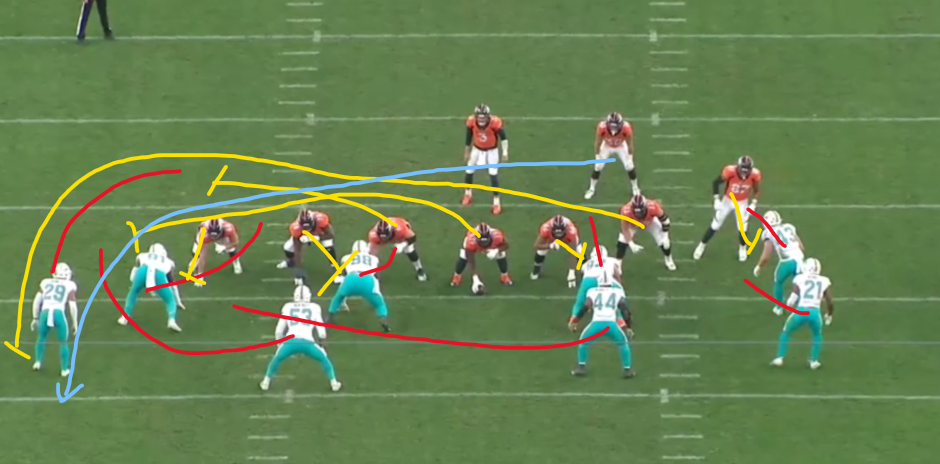
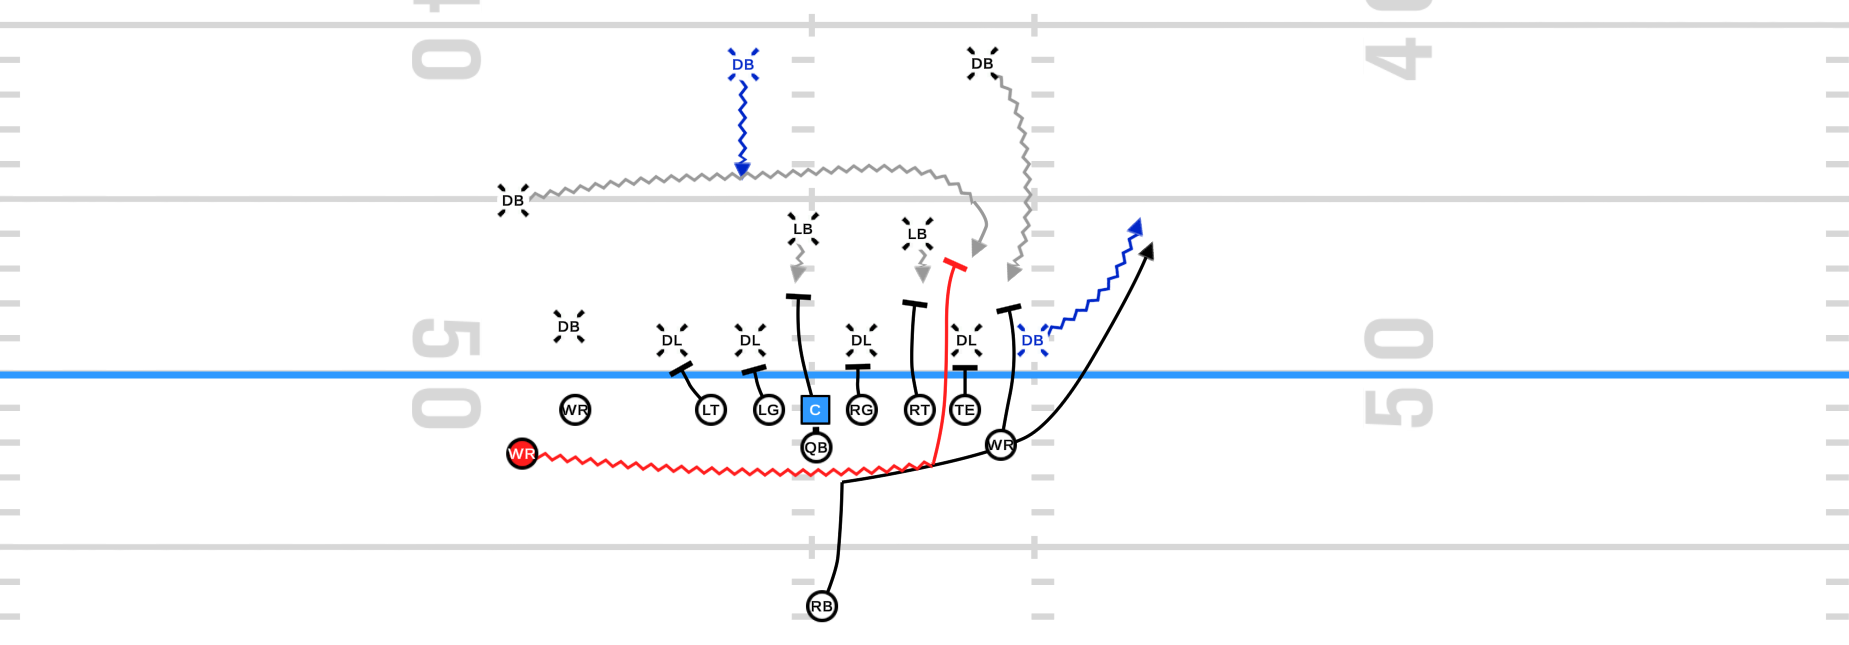
The jam/cornerback is conflicted 3 ways: jet away, punter running to him, and post behind him. This is an old game and the adjustment is probably to have everyone on the punt team to have peel rules for non-blockers, to have the LT accounted for on his route here. If there is a better solution please let me know.
Gunner jets on personal protector signal.
Ball snapped when jet intersects punter.
Punter keeps and runs to jet origin.
LT releases on a corner, aiming behind the CB.
CB is left in no-mans land between the jet, the punter with the ball, and the post behind him.
This is part 3 of the Romeo Crennel 2010 defensive coverage series. This article will outline some man coverages and the rules within them, including vice/cone double coverages and funneling.
Man-free and 2-man are not included here. Man-blitzes will be in a separate writeup.
Part 4 will be a continuation of man-coverages, looking at more man-matched calls including C4 Quarters.
VICE - Double Coverage on #2
Man-matched coverage call. This is a coverage built to distribute stress by alignment. Having the backer aligned inside taking inside routes, and safety aligned outside taking outside routes from #2.
Vice Route Distributions
Cornerback: lock on #1, outside and on top of the route. Late help from Will or WS to the inside and under.
Will: Cover #2 inside-out to 12yds (WS take #2 vertical). Carries #2 across formation on unders. If #2 breaks out, look to #1.
Weak Safety: Cover #2 outside-in and vertically. if #2 breaks out, take him man. If #2 breaks under, rob the curl of #1. Take all of #2 vertical.
CONE - Double coverage on the #1
Man-matched coverage call. Technique used to double the outside WR in and out. Called against tight split #1. Run force changes based on release of #1.
Cone Route Distributions
Cornerback: Press #1 outside-in. Responsible for all outside and deep routes. If #1 under, get depth and play QB.
Will: Cover running back man-man on everything. Expect no help.
Weak Safety: Read release of #1. Cover #1 inside and deep. If #1 out, drop to deep 1/2 and play QB.
Cover 1 Funnel (3-4)
3 on 2 funnel, with 3 backers funneling the 2 backs.
Man/Man coverage, with weak safety in the post and linebackers man-matching.
The backside outside linebacker will be tagged to rush (Roy/Lee call). 4man rush call.
Vs 2 back sets, linebackers funneling 3 on 2 against 2 backs.
vs 1 back sets, linebackers funneling 3 on 2 against HB and TE.
Manned safety is free to align deep or come down pre-snap.
Funnel Technique
This coverage employs a 3-on-2 funnel, with three backers on two running backs, or an HB and TE. There are three base distributions.
If both backs go STRONG, Sam takes first out, Mike takes second out, will sits in the hole
If both backs go WEAK, Will takes first out, Mike takes second out, Sam sits in the hole
If backs SPLIT, Sam takes the strong back, Will takes the weak back, and Mike stays in the hole.
Funnel against LOAD FLOW (2 backs release strong)
If TE shallow, Will picks up TE and SS robs the in-breaker from the opposite side. (SS must see the Y picked up by Will before releasing)
If TE up or out, Will replaces Mike in low hole and hunts crossers.
If both backs release same side, the backers initially taking them will carry them everywhere.
Load Flow Rules
Sam/Will
Take first back to my side.
If he goes shallow, release calling "under under", push to the hole. Opposite outside backer will pick up this release shallow if the 2nd back is not shallow.
If both backs away, Push to the hole. Look for first crosser.
Mike
Take second back to my side.
if he goes shallow, release and look to the flow side for a follow crosser.
Think a release like a back coming out in the "down" and breaking across the formation, followed by an angle route. You are releasing the down back and picking up the angle.
Funnel against SPLIT FLOW (1 back strong, 1 back weak)
Mike takes first crosser across his face
Sam/Will are passing the first crosser and looking opposite for a return crosser.
After distribution of backs, the free backer will prioritize cutting the TE.
Split Flow Rules
Will/Sam
First back to my side unless shallow (crossing). Release shallows.
If shallow released, check opposite side for first crosser coming my way.
If shallow released and no crosser, robot and cut the TE.
Taking a quick look at a handful of less-often seen runs, or standard runs with a bit of unique window dressing.
Notes are focused on the concept to be taken away from the clip, which can be applied across different calls and situations. Some of these concepts might be very basic or simple.
DAL vs MIN
HB is motioned from behind the QB, out to behind the first attached TE.
Concept: Sets up the near backers to be blocked at the second level with more favorable angles for the RG and TE, thanks to widening with the HB.
NE vs CLE
Gun toss sweep, with a tight bunch to gain a shortened edge.
Concept: Attacking the edge quickly has a chance of causing over pursuit. Keep an eye open for a cutback, or design to have blockers wall the pursuit away from desired cutback.
OAK vs LAC 1
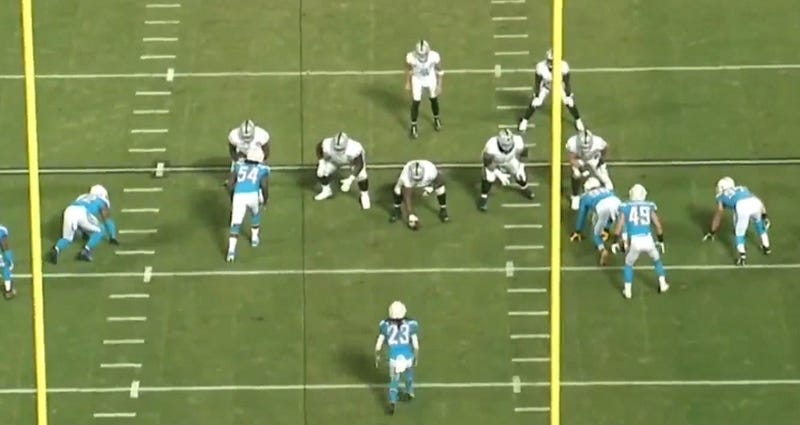
Split zone with a counter/misdirection. Slicing TE skips PSDE.
QB/HB showing split zone before re-routing to follow the slice, as well as OL blocking away, has PSDE step down too far to deal with HB coming his direction, gaining a blocker to that side by leaving PSDE unblocked.
Concept: If you are getting hard step-downs by the backside DE on zone block away, you can come back around with a puller/slicer and either log him inside or arc him as he takes himself out of the play.
OAK vs LAC 2
Another misdirection, this time with a detached HB coming jetting across. TE to the jet slices opposite.
Concept: Getting split flow independent of the ball carrier presents a very difficult situation to defenders.
SEA vs TB
End-around action by #1 to the field pulls the field safety away from the play, which leaves the alley open for the HB.
Concept: WR actions will typically disrupt the overhangs or 3rd level defenders. Aim the ball to the outside to attack this.
Call this front by any name. Miami has been running it fairly often, particularly as a 3rd down passing defense. In week 10 vs the Broncos, Miami called this 6 times, 5 of 6 on 3rd downs.
Results of this call are:
1 INT
2 PBU
2 Allowed First Downs
1 Tackle short of the 1st
This front works well vs the pass thanks to the constant movement and shifting causing uncertainty in the QB and OL pass blocking call.
Typically Miami has their standard pass rushers in and does send them, but there is the possibility to run very light packages like the dollar to further hide who is coming and who is dropping.
The dolphins often will run line twists or looping blitzes with this front, as well as overloading a single side of the line.
The ability to drop or rush from various locations also lends itself to many different easily disguised coverages.
1. 3rd&10, 1st quarter, INT
DOLLAR personnel. 4man rush, with a strong addon (sam-aligned player). Looks like a C3 variant.
In this writeup, we are taking a look at how Miami used their DBs in the run fit.
This is primarily in their 3-3-5, with OLBs on the line presenting a 5man front and SS in the box to the strength with the Nickle close to the box on the backside. The only LB not on the LOS is the Mike.
This is not only snaps from this alignment. Also not all snaps in the game from this alignment.
Miami DBs have good impact when playing downhill between the tackles, getting to their gap, finding the ball carrier, and securing tackles. Miami's nose tackle in these plays also has very good impact.
Problems begin to arise when the ball carrier takes an outside path, with lead blockers taking on the edge.
See film cutups at the bottom of the page.
SOLID FITS
1.
Mike is making the Nose right, with nose playing either A gap. The nose shows his helmet to the left, forcing the ball carrier to the right and then shedding the Center and getting hands on the ball carrier.
The blitzing down safety to the strength meets the ball carrier in the hole, beating WR insert block to the inside.
2.
The Nickle to the backside plays patiently in the run, since the backside is fully gapped out and he is a +1. When the ball carrier heads to his side, the Nickle triggers down and meets the HB in the hole.
Like the prior play, the Nose is staying square on the Center and threatening both A gaps. Nose shows his helmet to the right in the strongside A gap, and after the ball carrier bounces to the backside A gap the Nose sheds his man and again gets to the ball carrier at the line.
3.
TE meant to come up off his playside double and pick up #21 misses his block. #21 makes the tackle at the line.
MISSED FITS
4.
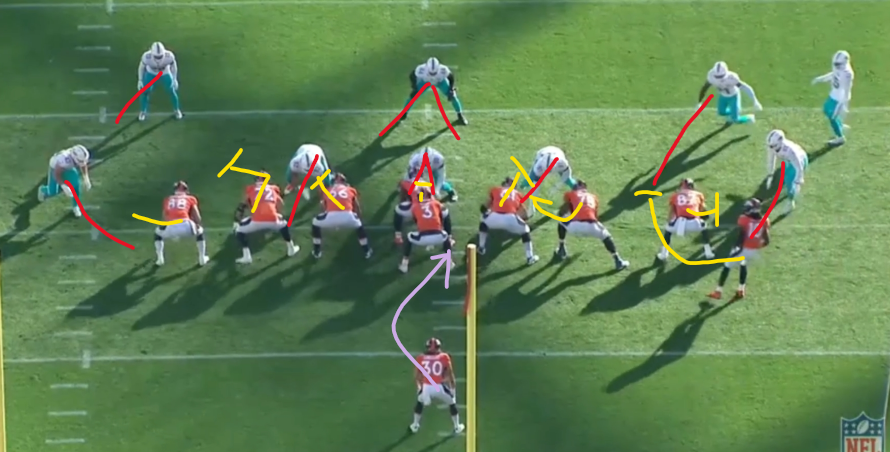
Double fold blocks with the Center pull here gives a +1 to the playside for the offense. Due to the front, there are no defenders able to adjust to the center pull.
Down safety #21 following TE motion is the target of the Center pull, and does get kicked out of the picture leading to an explosive run.
5.
TE forces #44 to go under the block, taking him behind the ball carrier. #53 gets kicked wide.
Down safety #21 gets over the crack block untouched, but gets beaten to the sideline for an explosive run. CB to the playside stayed on the crack runner and did not replace the edge fast enough, also gets beat to the sideline.
6.
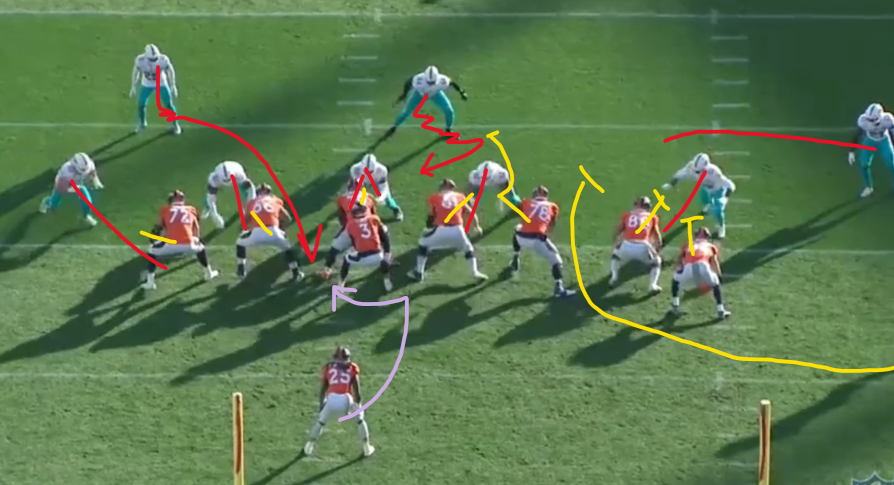
Denver pulls 3 blockers. Miami #44 and #21 would need to both gap down with pullers, but were both a step too slow. #44 misses
#29 to the strength gets kicked out wide on his blitz.
7.
Playside edge gets logged by pulling guard.
#29 meets pulling BST on the edge., and gets tossed to the ground.
While sound against interior runs, Miami did have some struggles this game with runs to the edge, thanks often to the mismatches their alignment and personnel created against pulling linemen. See film of these plays below.
From a 4-3, 2-high look Tampa may have a WR slide motion towards the core and work inside towards the near safety.
The ball carrier drives downhill on snap, banging to the outside late.
OL are all zone-stepping to the field (away from the bounce), getting defense to flow with blocks.
Cracking Down Safety
Against a 4-4, 1-high look, Tampa brings WR in motion to the core again and has him work to get square on the down-safety, who is flowing with the rest of the defense towards the counter footwork.
HB bounces outside hard and is put in a 1-on-1 in space with the CB who had bailed pre-snap on motion.
Inserting to Bring Safety Down
On motion CB sinks to defend pass while SS comes down to replace in run fit. This makes is much easier to for TB get a blocker on SS, while making it convenient to leave CB unblocked.
The runner again departs downhill, bouncing to the outside quickly to exploit the mismatch on the perimeter vs a lone cornerback.
Against a team looking to push routes deep down the field, a 3-high structure can provide great value. Tampa Bay saw good success with this against KC in the Super Bowl. See more details on a 3-high defense here.
It removes middle field open / closed reads presnap (from 2high and 1high looks respectively)
Adds flexibility in coverages. Particularly in top-down rotations.
Can align potential deep defenders at a better depth to stay over any deep routes from a speedy receiver.
Tampa played fivesnaps of 3-deep presnap looks.
Twosnaps of a 1-deep, 5 under STICKS coverage..
Two snaps of a boundary rotation cover 3.
One snap of straight cover 3.
Outcomes: 1 Int, 2 Inc, 2 checkdowns allowed.
Note TB played a bunch of 3-deep prevent calls at the end of the game, which we are not including here.
FILM
If you are not able to see the film here while on a phone, either open the page in "desktop mode" or open it on a computer.
1st Quarter, 11:34, 3&8 - STICKS (1-deep 5-under)
Boundary and Middle safety drop to hook/hole at sticks. Here we can see all 5 underneath defenders within 2yds of the 1st down marker. Nobody matches either vertical route up the middle. Compare this to the next play.
Here we see a great sample of the flexibility of a 3-high look. BCB and Sam (Ni) blitz both edges and are replaced in coverage by the outside safeties, while mugged backers drop out into the hooks at the marker. In coverage, note both corners playing top-down on the possible outside verticals, to make sure the single deep safety is not outnumbered as he was the prior clip.
2nd Quarter, 2:00, 1&10 - Straight C3
While not a standard 3-high look with the outside CB as 3rd high defender, it ends up playing like a standard 3-high with the Sam (Ni) here replacing the CB as flat defender. Pausing halfway into the play, you can see the distributions of the 3-deep 4-under.
3rd Quarter, 6:30, 3&13 - C3 Boundary Rotation
Boundary and Middle safety are dropping, while both CBs are taking deep 3rds from a backpedal on snap. With no vertical, a CB will continue to zone off to his deep 3rd to make sure he takes away any deep crosses. Boundary corner #24 here s pulled down a bit by the hunt route of #87, while #10 is running the deep cross behind him. #24 manages to get back and make a great play on the ball to cause a turnover.
4th Quarter, 6:22, 2&10 - C3 Boundary Rotation
Same rotations as prior clip. While not targeted, KC does run another deep cross aimed behind the boundary corner.
One way Kansas City puts the elite speed and quickness of Tyreek Hill to use is with pre-snap motions (orbit and jet). They use speed and movement pre-snap to either out leverage the defense with speed, or force the defense to put eyes in the wrong places and create hesitation or false steps. The outcome is to create conflict for a defense in multiple directions, causing the defense to play slower or be out of position.
This writeup outlines 10 misdirections from the AFC championship.
7 of 10 misdirections feature Tyreek Hill.
4 of 10 are aiming to get ball to Travis Kelce.
ORBIT SERIES
1st&10, 3:45 1st Quarter
Near slot (#10) to the 3WR side goes in across-return-orbit motion.
This is followed by a play-action with eyes to the overhang defender (#24) to the bottom of screen. Note this is not an RPO.
This concept has three main outcomes:
A) Freeze the overhang and make him slow to fit the run (if RPO/for future calls).
B) Force the overhang to push with the orbit, and open the window for the crosser behind him.
C) Get the orbit runner outside of the overhang, and throw the ball to him in space.
With the overhang (#24) so far inside immediately after the PA, the ball going to the orbit swing in space is a great option. By design however, it looks like this specific snap the idea is to wait for the overhang to drift outside with the swing, and put the ball directly in the window between the Mike and the overhang.
4&1, 1:33 1st Quarter
One variant of the many of the must-have KC conversion plays with sprint outs or boots to the right side flat.
Slot (#10) to the field goes in across-return-orbit motion, and stops in a pistol alignment.
The PA fake goes to the field, and QB spins out on the naked boot to drop ball in the flat to the offset back releasing. This motion and action mainly affects the inside backers, who both step hard for the run fake. That said, it is unlikely they have any impact in the pass to the flat here.
The key to this plays success is #13 to the boundary. He has a good release, which collisions the DB working to the flat, and creates an opportunity for the offset back to out leverage him quickly in the short yardage situation.
1&G(6), 10:10 2nd Quarter
Same look as from first clip. Near slot to the 3WR side goes in across-return-orbit motion.
This time the design is taking advantage of the Mike backer (#49) aligned over the LT/LG.
#49 is playing top-down reading run/pass before committing, making sure he does not open a window for a possible immediate touchdown route behind him by driving on the PA so close to the endzone.
This puts him at an angle to get fully walled off by the doubleteam of the RT/RG working up to him, and puts the safety in a one-on-one with the HB coming downhill with momentum in the hole 6yds off the LOS.
JET SERIES
2&1, 5:45 1st Quarter
Empty FIB, Tyreek Hill comes in jet motion from the trey slot.
When a defense aligns 2-high, it eliminates much of the need to shift the secondary on motions. That is what we see here.
At the snap Buffalo is aligned 3-over-2 to both sides of the field, with jet in the backfield.
Note that by not shifting the backend, Buffalo stays sound to the quick screen, but gives a bad look in the case of a jet give.
Stress is on the overhang to the field eying the jet to beat his block, and on the safety here who is working to stay over the #2 WR and would likely be the free hitter to the jet runner.
2&2, 15:00 2nd Quarter
Same formation FIB as the prio jet clip. Defense also plays it from the same alignment (less depth on goal line) and with minimal adjustment to motion.
Kansas City goes to their G skip shovel. They leave the playside DE unblocked again while LT works to the backside overhang, and the skip-pulling RG works to the Mike.
1&10, 12:37 3rd Quarter
Outside man (#10) in the close bunch motions across the formation, and comes back in jet motion.
Ball is snapped and the defense is presented with two looks:
1. To the boundary, they are getting an outside zone look with the OL and HB actions.
2. To the field, and where the ball goes, is the jet sweep.
Both of the playside DL are passed up by RT and RG. RG is freed up to the 3rd level since LG gets to the Will, while RT works to wall the Mike from the jet.
Note the Mike working hard at an angle to avoid getting walled completely. This comes up in the next clip.
TE #87 arcs around the PSDE to the Ni/Sam, while #1 WR is taking the CB wherever the CB wants to go. With CB attempting to set edge, he is widened further and space for the runner to get upfield is created.
1&G(1), 3:34 3rd Quarter
This play is built off of the prior clip. Same formation and motions.
This time, the QB and HB both step away from the jet, with what begins to look like one of the many sprint-out calls KC likes to run.
From the backside, the LG skip pulls to the frontside C gap while the frontside blockers are working down the line. PSDE is unblocked again which leaves space for TE #87 to take the shovel and work vertical for enough yards to score.
Note this time, the Mike (#49) steps hard with the jet action and takes himself out of the play, to avoid getting walled for a touchdown. Looks like the RT was meant to work up to the Mike but saw him vacate the area so grabbed Will.
3&5, 7:41 4th Quarter
2x2, the off man stacked to the field goes in jet motion. The secondary communicates to push the coverage with the jet.
The coverage to the new 3x1 set puts boundary safety #21 in man on TE #87 it appears. #21 is on skates with the motion and quick coverage adjustment, and so #87 leaks across the field open for a score.
Note to the backline #10 coming uncovered after quickly beating his man across the field, and #13 coming from the single coming open on the deep mesh rub at the opposite hash.
OTHER MISDIRECTIONS
1&10, 12:26 2nd Quarter
This is a very similar to a play Tampa Bay ran in their Wildcard matchup earlier in this playoff.
TE #87 motions over to a Y-off alignment creating a close bunch to the field, and goes on a slice path on snap, giving a split-zone or GY counter look to the backers on his side (#49, #24).
This action, along with the LG pull, pulls backers further into the box. The QB and HB work a play-action.
Meanwhile to the backside, the single WR begins his end-around on snap and receives the QB pitch.
TE #87 spins out of his slice steps and works back to the playside.
LT, C, RT all manage to work through the box to help seal for the end around.
All together, these actions leave the backers to the frontside too far inside, getting walled. It leaves only the CB to the outside trying to contain, and a single high safety keeping the play in front and slowing it down for pursuit. All against two linemen and a TE working to the 3rd level.
1&10, 12:12 2nd Quarter
HB pushes out pre-snap creating a 4x1, forcing Mike (#49) to widen with him.
The #3 WR to the trio (#13) curls up in the window between the widened Mike and the Will to the inside.
In their wildcard matchup against the Washington Football Team, the Tampa Bay Buccaneers utilized a series of plays featuring split zone actions, jet motions, and end-arounds to force the Washington defense to shift, generating a number of explosive play opportunities.
Using motions across the formation pre-snap, Tampa forces Washington's backers to push down and create mismatches or conflicts for the edge defenders.
Using split-zone actions (down-blocks and slices across from the TE), Tampa muddies and confuses the read for the secondary run-fitters (reading TE) and the backside DE (reading the down-block). This is followed with misdirection plays taking advantage of these muddied reads, attacking the edges of the formation.
Related plays not shown: 4 split zone run calls, 1 split zone play-action, and 1 jet sweep play action.
DETAILS
1&10, 1st drive of the game.
WR #81 (Antonio Brown) motions across the formation creates a 6 on 7 in the box, in favor of the offense.
This creates conflict for the slot defender, who has followed the motion and is now fitting the B gap from outside of the box.
One way teams alleviate this is by having the field DE shift tighter to the tackle and work into the B gap, or squeeze harder behind the down block to try and spill the kickout to the wider run defender.
1st&10, 2nd quarter
There is plenty of backfield action here, which quickly takes advantage of the defense.
HB swing action to the boundary, while the TE and #1 WR in the bunch are pulling around to the wide side of the field.
The O-line combined with the TE makes it look like split zone, which typically has the ball carrier hitting inside of the tackle box.
Reading split zone, the 9 defenders closest to the box take initial steps towards the center of the formation. DE #95 steps down hard behind the down block expecting to squeeze or get under any kickouts, and so the TE simply bypasses him and takes his block to the 3rd level unabated.
With the TE pulling, this creates a 4-on-4 box count to the playside. With the DE being skipped, the offense is gaining an extra blocker.
Worth noting: this play is ran while Chase Young is not on the field, to the side he typically defends.
2pt conversion, 2nd quarter
#81 jet motion across the formation causes backers to "pull the chain," leaving a defensive back to fit off of the DE on the edge.
DE #91 (Chase Young) jumps the B gap, forcing the runner to bounce outside to the free-hitting DB on the edge.
If the HB keeps his footing, this looks like it may be points on the board with the HB coming downhill fast on a DB in a 1-on-1 needing only 2 yards.
1st&10, 4th quarter
TE #84 goes on short return motion, followed by a pull giving a split-zone look. He then spins around in the backfield after a very short pull, and works back towards the wide side of the field.
Similar to the second clip, we can see all 10 players near the box step into the center of the formation, expecting split-zone thanks to the reads being created by the offense (OL down blocking, TE taking slicing action, and QB/HB fake).
Tampa had not run any two-man pulls this game, so the RG pulling up looks to me just like a way to replace the kick-out of the spinning TE, and seal out the backside pursuit of the disruptive Chase Young (#99).
The RT, C, and TE do a great job of working to the edge through the middle of the formation.
------------
Using frequent split-zone run calls, Tampa set up their misdirection plays to attack the edges of formations.
Using motions across the formation, Tampa created mismatches or tough fits for the Washington secondary.
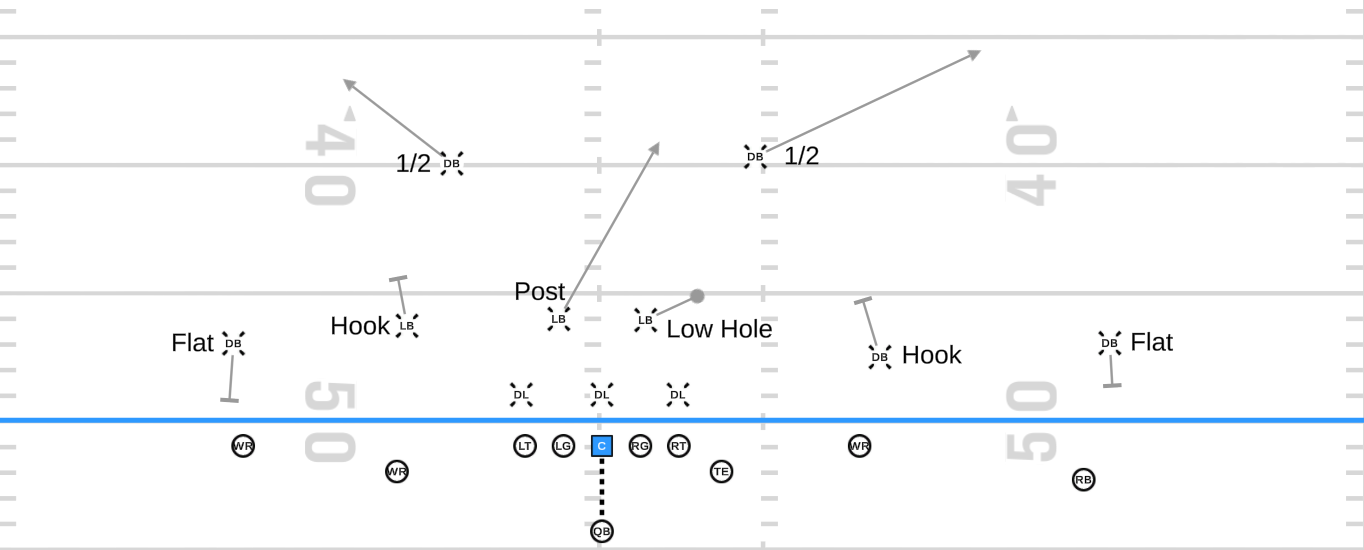
Romeo Crennel in 2010 was bringing essentially two calls against empty, with adjustments for sub packages. One being a Tampa 2 variant, and the other being a cover 0 man blitz.
STRETCH (FLEX)
This is Coach Crennel's Tampa 2 call vs empty. Stretch is called with base personnel. Flex is the call for sub 3-4 personnel.
Alignment notes: Mike (low hole) can align as 9tech vs an attached TE, or hipped off the OT vs a detached receiver.
Coverage
Flat (CB) - outside the numbers, covering all outs and comebacks. Carry WR to the seam before releasing. Keep eye on #2 breaking out.
Hook (Ni, Jack) - Covering outside the hashes, and not going beyond the numbers. Take 1st in-breaker, and deliver to the Rat (low hole).
Low Hole/Rat (Mike) - This is the extra coverage gained when rushing 3 instead of 4. Typically opens to the #3 receiver side. Jam any crossers, read QB, depth is around 8-12 yds.
Post (Will) - Opens to most dangerous side determined by game plan / personnel. Closes the post to any vertical routes (between hashes).
There are no explicit rules on how to deal with a 4th or the rare 5th vertical with the only three assigned deep players (safeties and will).
Some coverages would have CBs take #1 vertical if #2 is not OUT in the first ~5yds.
May be playing to have Safeties and Post defender midpoint over top of all verticals and defend them that way.
RAIN (FALCON)
Rain
Falcon
Rain (Falcon) is a check vs empty, man coverage across the board with a 6man pressure.
Front
Defensive line slides to the formation strength (TE here, or 3 WR side), and the backside backer (Jack) becomes the DE on the backside. The front is aligned EVEN.
Depending on offensive line slide, either Mike or Will may drop into coverage (if they get a slide TO).
Vs attached TE, the frontside DE takes the point and the Sam (Ni) will come down and press the TE inside. If TE blocks out onto the DE, DE will man him and Sam (Ni) will blitz.
Coverage
Coverage matchups will be determined by game plan or base rules.
The coverage is man/man and locked on all motions. If motion ends in the backfield, the defender will match box location.
In part 3, we are outlining some base man coverage calls, as well as some of Romeo Crennel's core man coverage principles.
This is based on the 2010 KC Chiefs defensive playbook, which can be found online.
This is part 1 of a (??) part series. In this first part, we are outlining the core terms of Coach Crennel's coverages during his time at Kansas City in 2010. This is to establish concrete definitions to some of the base terms before getting into the coverages themselves.
After the first few parts of this series going over coverages and rules, we will look at the 2020 Texans film and see how concept have carried over to Romeo Crennel's current team.
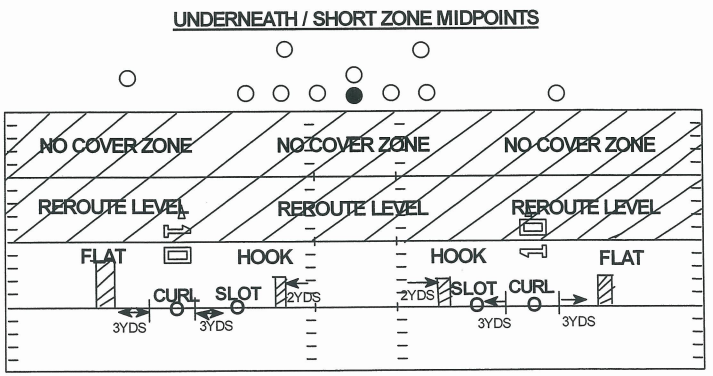
ZONE DESCRIPTIONS
UNDERNEATH AND SHORT ZONES
Flat - 12 to 15yds, midpoint 3yds outside numbers
Curl - 15yds, midpoint on numbers
Slot - 15yds, midpoint 3yds inside numbers
Hook - 12 to 15yds, midpoint 2yds outside hash
No Cover - Behind LOS, up to 5yds beyond LOS
Reroute Level - 5 to 12yds, where receivers must be rerouted or patterns matched
Other Terms
"Hold the Curl" - Tells curl defender to hang in curl zone as long as needed to prevent a pass.
"2nd Man Thru" - Refers to second receiver running through an outside zone (curl or flat). Defender responsible for that zone will play the 2nd man all the way.
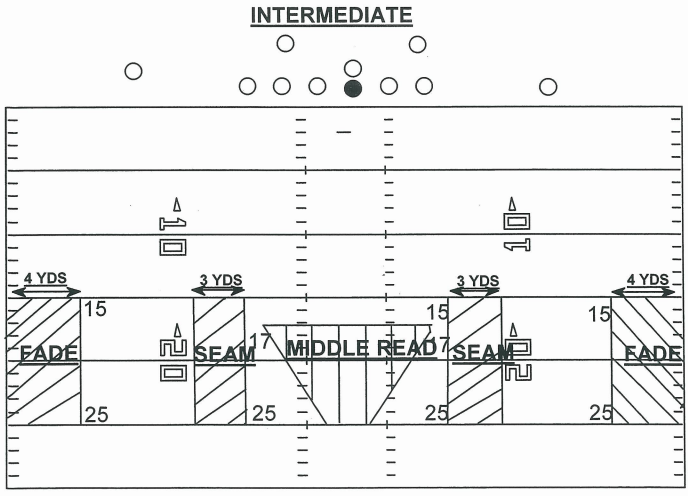
INTERMEDIATE ZONES
Fade - from sideline +4yds inside, 15-25yds depth
Seam - from inside of numbers +3yds, 15-25yds depth
Middle Read - Basically between hashes, 17-25yds depth (cover 2)
Other Terms
"Hold the Seam" - Tells seam defender to hang in the seam as long as needed to prevent a pass.
"Carry the Fade" - Tells cornerback to sink with the receiver through the fade area.
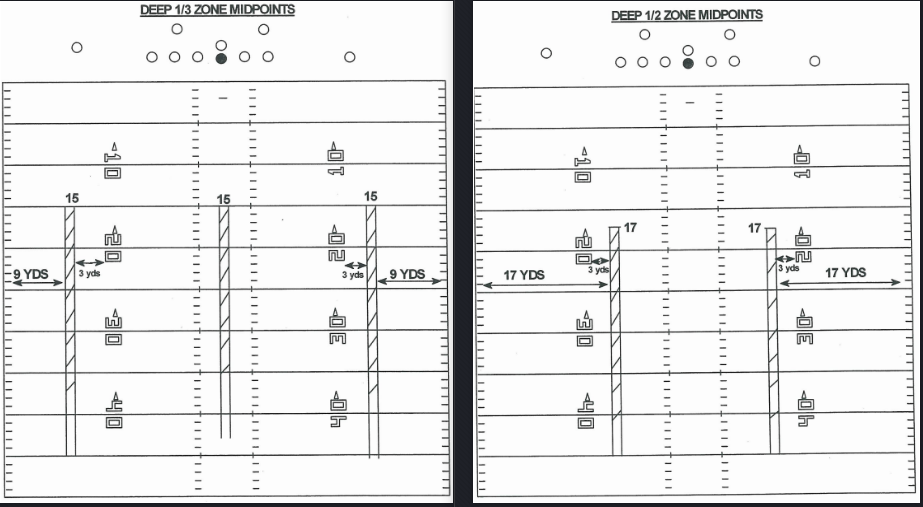
DEEP ZONES (thirds and halves)
Deep 1/3 Zone - Covers 1/3 of field, from 15yds to end line.
Deep 1/3 Midpoints - 9yds from sideline, and the middle of the field.
Deep 1/2 Zone - 1/2 of field, from 17yds to the end line.
Deep 1/2 Midpoint - 17yds, 3yds from inside numbers and extending to the end line.
In part 2, we will look at coverage calls vs Empty sets.
The intent of this article is to gain a general idea of what return formations in the NFL look like. It does sample kickoffs from every team, but not every kickoff from the season.
Formations
6-2-2-1
6-2-1-2
6-2-1-1-1 (unbalanced)
5-3-2-1
5-3-1-2
4/2-2-2-1
6-2-2-1 and 5-3-2-1 are the primary/base formations for most of the league.
Depth, alignments, and splits tend to be slightly different depending on game situation and opposing kicker/coverage team.
Taking a look at some of the causes and factors in each of the 10 sacks during Miami's first six games. We can also look back at problems, similarities, and differences in protection and sacks between R. Fitzpatrick and T. Tagovailoa after he starts a few games.
Matched Box Wide Front. Only backer in box (49) matches HB.
KEY POINTS
This front is called strictly on anticipated passing downs. Called on 5% of all snaps sampled for this article, but more than 20% of 3rd downs. Nearly all on 3rd&4+.
The wide front is a 4-down front, with center and both guards uncovered. (Tackles 4i/4/5, Ends 7/9 techniques)
Advantages of the wide front are in creating four possible 1-on-1s (OTs, OGs), removing much of the impact of the Center sliding to either side, and opening space with wide alignments to be attacked with line games.
Film of these disguises in action is linked at the bottom.
The What.
While this article won’t get into too much detail of base Tampa 2, the basics are:
Two-deep zones, typically covered by safeties in a two-high shell.
Pole runner, typically a linebacker, covering the middle of the field, between the hashes.
Four underneath zones. Two CBs playing sink-flats, two LBs playing hook-curl zones. CBs may be carrying #1 WRs vertical to help deal with possible 4-verts.
Typically the low middle is vacated by the pole runner (blue zone circled above). Some teams will drop a DL into this zone off the line.
Disguising Tampa 2 typically comes from either disguising the players responsible for covering the two-deep zones, or disguising the pole runner.
From offensive snaps in weeks 1–4 of the 2020 NFL season: New England, Tampa Bay, Miami. Cutups at the bottom.
Disclaimer: this is an experimental breakdown. The goal here is to attempt to divorce some very general causes of negative runs from the specific defensive fronts, blocking, and run schemes. At least divorce as far as possible without losing all meaning and context. Leave a comment here or on reddit with some feedback.
Here we will look at some of the most common causes of run plays in the NFL resulting in +1 yards or less. Causes being addressed are listed below.
Unblocked Backside Edge Defender
Defensive End/Edge + Linebacker Gap Exchange on a Down Block
Zone Runs Against Bear Fronts
Tight End Blocking a Defensive End at Point of Attack