Handful of plays I watched recently and wanted to note down. Either old youtube videos or recent games.
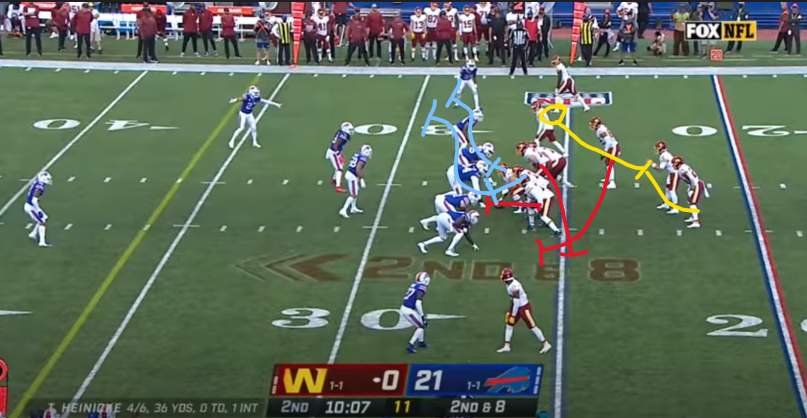
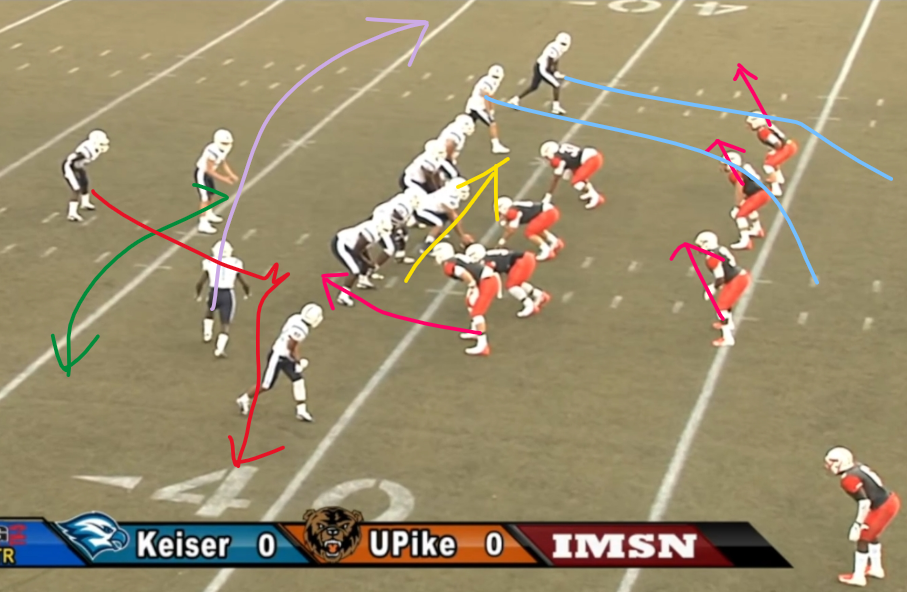
1. Fake Power Screen Away
The fake same side power action by the Sniffer and OL has the LBs pushing away from the screen, creating favorable angles for the linemen getting out to block for the screen.
Faking same side power with Sniffer lead and RG kick.
LT, LG, C all block down but they make sure to stay on the LOS, to avoid getting downfield before the screen is thrown.
LG and C take a 1 second count on their block, then shed out to the screen.
HB fakes like he is picking up the Ni blitz after the PA, then olays and goes for screen.
WRs run off the underneath coverage.
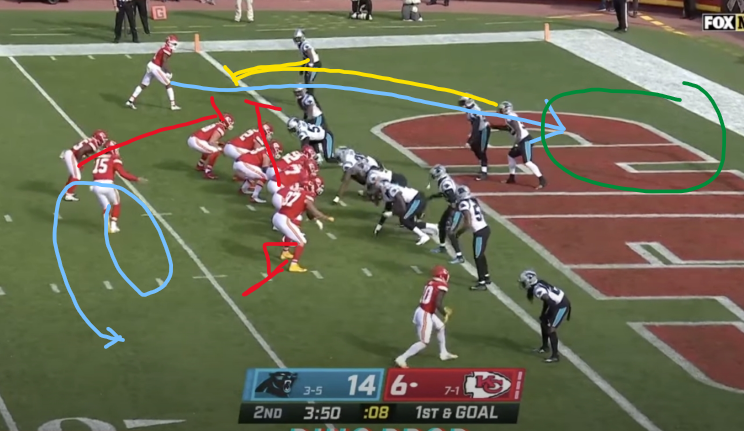
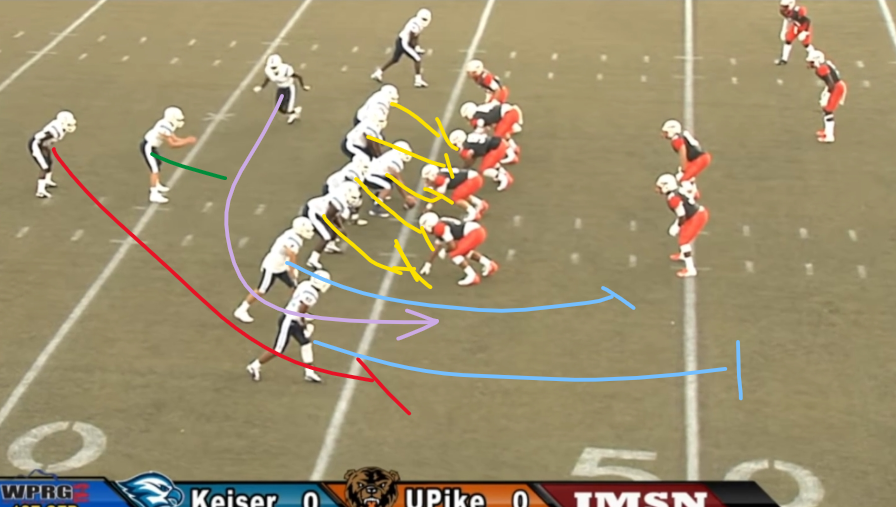
2. QB motion spinout
The QB taking the snap with speed to the boundary, as well as the offensive line blocking down and the HB leading to the edge, all encourage the line backers to flow boundary. This opens a window for the crosser when the QB spins out.
QB steps to the field, then at a run back towards the center takes a snap in the gun (think jet motion). QB spins out to the field after taking the snap.
Offensive line zone blocks down the line, with HB lead making it look like QB zone lead.
TE hinging on the backside to seal the edge for the spinout.
LBs flow with the backfield and OL actions, and CB steps down to set the edge, putting them all out of position against the crosser.
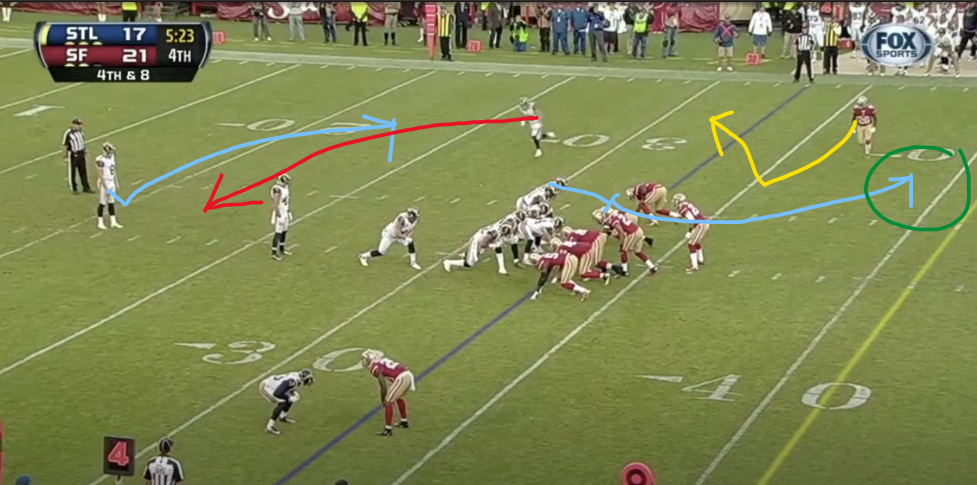
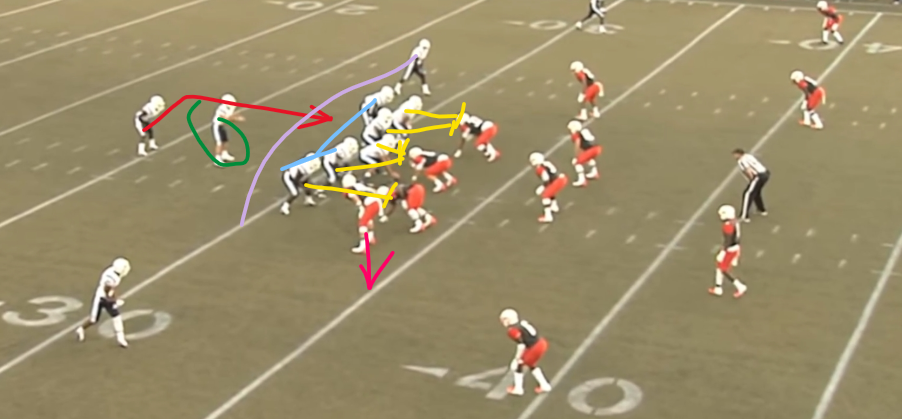
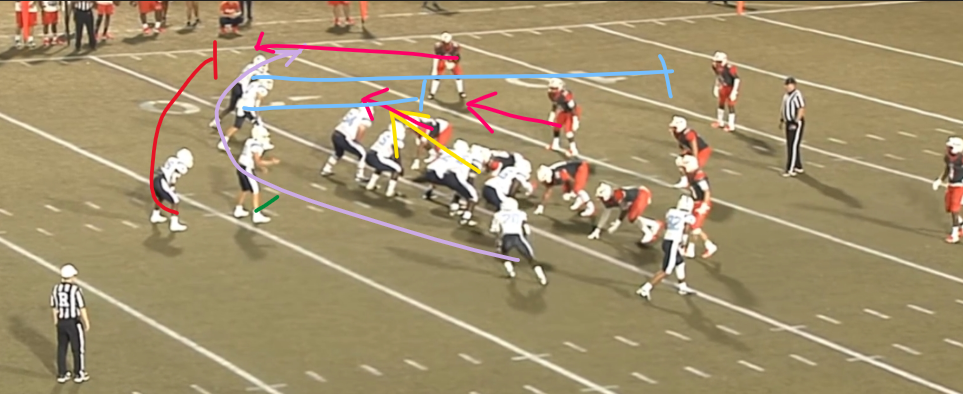
3. Punt - Jet RPO
The jam/cornerback is conflicted 3 ways: jet away, punter running to him, and post behind him. This is an old game and the adjustment is probably to have everyone on the punt team to have peel rules for non-blockers, to have the LT accounted for on his route here. If there is a better solution please let me know.
Gunner jets on personal protector signal.
Ball snapped when jet intersects punter.
Punter keeps and runs to jet origin.
LT releases on a corner, aiming behind the CB.
CB is left in no-mans land between the jet, the punter with the ball, and the post behind him.
Taking a quick look at a handful of less-often seen runs, or standard runs with a bit of unique window dressing.
Notes are focused on the concept to be taken away from the clip, which can be applied across different calls and situations. Some of these concepts might be very basic or simple.
DAL vs MIN
HB is motioned from behind the QB, out to behind the first attached TE.
Concept: Sets up the near backers to be blocked at the second level with more favorable angles for the RG and TE, thanks to widening with the HB.
NE vs CLE
Gun toss sweep, with a tight bunch to gain a shortened edge.
Concept: Attacking the edge quickly has a chance of causing over pursuit. Keep an eye open for a cutback, or design to have blockers wall the pursuit away from desired cutback.
OAK vs LAC 1
Split zone with a counter/misdirection. Slicing TE skips PSDE.
QB/HB showing split zone before re-routing to follow the slice, as well as OL blocking away, has PSDE step down too far to deal with HB coming his direction, gaining a blocker to that side by leaving PSDE unblocked.
Concept: If you are getting hard step-downs by the backside DE on zone block away, you can come back around with a puller/slicer and either log him inside or arc him as he takes himself out of the play.
OAK vs LAC 2
Another misdirection, this time with a detached HB coming jetting across. TE to the jet slices opposite.
Concept: Getting split flow independent of the ball carrier presents a very difficult situation to defenders.
SEA vs TB
End-around action by #1 to the field pulls the field safety away from the play, which leaves the alley open for the HB.
Concept: WR actions will typically disrupt the overhangs or 3rd level defenders. Aim the ball to the outside to attack this.
Keiser put up an impressive record in their first 3 years as a program, going 24-6 overall. This is part 1 of who knows how many writeups, looking at some of the things they do well and attempting to get an idea of how they have been so dominant.
In this part, we are looking at their jet sweep series in their first game as a program back in 2018.
Keiser gets a favorable alignment out of their 2x2 jet, in 3 of the 4 jet calls. Great angles to block the Sam or Will to the interior.
There are 3 calls in their first possession, and one in the 3rd quarter. This does not include one call where there is no sweep action since ball is snapped after the jet motion is across.
See cutup of these plays at the bottom of the page.
1. Fk Jet Duo
Line blocking duo, driving doubles and only coming off once backers declare. Y off slices backside. Ball is jumbled at the mesh. +2yds.
2. PA Jet Flood
All OL open to sideline and begin running to block for the sweep. QB fakes the jet give, and boots away. HB olays the standing DE and goes flat. Backers are influenced by the sweep action with no reaction to the split flow. HB ends up uncovered for a solid gain. +10yds.
3. Jet sweep lead
OL playing for doubleteam reach blocks on playside DL. C and LG drive nose into Mike 6yds deep. HB aims to lead up the edge, to the first threat (this time PSDE). +7yds.
4. Jet sweep lead
Same offensive call as above, now in 3rd quarter. PSDE does not get reached, and CB plays hard on edge. +0yds.
One way Kansas City puts the elite speed and quickness of Tyreek Hill to use is with pre-snap motions (orbit and jet). They use speed and movement pre-snap to either out leverage the defense with speed, or force the defense to put eyes in the wrong places and create hesitation or false steps. The outcome is to create conflict for a defense in multiple directions, causing the defense to play slower or be out of position.
This writeup outlines 10 misdirections from the AFC championship.
7 of 10 misdirections feature Tyreek Hill.
4 of 10 are aiming to get ball to Travis Kelce.
ORBIT SERIES
1st&10, 3:45 1st Quarter
Near slot (#10) to the 3WR side goes in across-return-orbit motion.
This is followed by a play-action with eyes to the overhang defender (#24) to the bottom of screen. Note this is not an RPO.
This concept has three main outcomes:
A) Freeze the overhang and make him slow to fit the run (if RPO/for future calls).
B) Force the overhang to push with the orbit, and open the window for the crosser behind him.
C) Get the orbit runner outside of the overhang, and throw the ball to him in space.
With the overhang (#24) so far inside immediately after the PA, the ball going to the orbit swing in space is a great option. By design however, it looks like this specific snap the idea is to wait for the overhang to drift outside with the swing, and put the ball directly in the window between the Mike and the overhang.
4&1, 1:33 1st Quarter
One variant of the many of the must-have KC conversion plays with sprint outs or boots to the right side flat.
Slot (#10) to the field goes in across-return-orbit motion, and stops in a pistol alignment.
The PA fake goes to the field, and QB spins out on the naked boot to drop ball in the flat to the offset back releasing. This motion and action mainly affects the inside backers, who both step hard for the run fake. That said, it is unlikely they have any impact in the pass to the flat here.
The key to this plays success is #13 to the boundary. He has a good release, which collisions the DB working to the flat, and creates an opportunity for the offset back to out leverage him quickly in the short yardage situation.
1&G(6), 10:10 2nd Quarter
Same look as from first clip. Near slot to the 3WR side goes in across-return-orbit motion.
This time the design is taking advantage of the Mike backer (#49) aligned over the LT/LG.
#49 is playing top-down reading run/pass before committing, making sure he does not open a window for a possible immediate touchdown route behind him by driving on the PA so close to the endzone.
This puts him at an angle to get fully walled off by the doubleteam of the RT/RG working up to him, and puts the safety in a one-on-one with the HB coming downhill with momentum in the hole 6yds off the LOS.
JET SERIES
2&1, 5:45 1st Quarter
Empty FIB, Tyreek Hill comes in jet motion from the trey slot.
When a defense aligns 2-high, it eliminates much of the need to shift the secondary on motions. That is what we see here.
At the snap Buffalo is aligned 3-over-2 to both sides of the field, with jet in the backfield.
Note that by not shifting the backend, Buffalo stays sound to the quick screen, but gives a bad look in the case of a jet give.
Stress is on the overhang to the field eying the jet to beat his block, and on the safety here who is working to stay over the #2 WR and would likely be the free hitter to the jet runner.
2&2, 15:00 2nd Quarter
Same formation FIB as the prio jet clip. Defense also plays it from the same alignment (less depth on goal line) and with minimal adjustment to motion.
Kansas City goes to their G skip shovel. They leave the playside DE unblocked again while LT works to the backside overhang, and the skip-pulling RG works to the Mike.
1&10, 12:37 3rd Quarter
Outside man (#10) in the close bunch motions across the formation, and comes back in jet motion.
Ball is snapped and the defense is presented with two looks:
1. To the boundary, they are getting an outside zone look with the OL and HB actions.
2. To the field, and where the ball goes, is the jet sweep.
Both of the playside DL are passed up by RT and RG. RG is freed up to the 3rd level since LG gets to the Will, while RT works to wall the Mike from the jet.
Note the Mike working hard at an angle to avoid getting walled completely. This comes up in the next clip.
TE #87 arcs around the PSDE to the Ni/Sam, while #1 WR is taking the CB wherever the CB wants to go. With CB attempting to set edge, he is widened further and space for the runner to get upfield is created.
1&G(1), 3:34 3rd Quarter
This play is built off of the prior clip. Same formation and motions.
This time, the QB and HB both step away from the jet, with what begins to look like one of the many sprint-out calls KC likes to run.
From the backside, the LG skip pulls to the frontside C gap while the frontside blockers are working down the line. PSDE is unblocked again which leaves space for TE #87 to take the shovel and work vertical for enough yards to score.
Note this time, the Mike (#49) steps hard with the jet action and takes himself out of the play, to avoid getting walled for a touchdown. Looks like the RT was meant to work up to the Mike but saw him vacate the area so grabbed Will.
3&5, 7:41 4th Quarter
2x2, the off man stacked to the field goes in jet motion. The secondary communicates to push the coverage with the jet.
The coverage to the new 3x1 set puts boundary safety #21 in man on TE #87 it appears. #21 is on skates with the motion and quick coverage adjustment, and so #87 leaks across the field open for a score.
Note to the backline #10 coming uncovered after quickly beating his man across the field, and #13 coming from the single coming open on the deep mesh rub at the opposite hash.
OTHER MISDIRECTIONS
1&10, 12:26 2nd Quarter
This is a very similar to a play Tampa Bay ran in their Wildcard matchup earlier in this playoff.
TE #87 motions over to a Y-off alignment creating a close bunch to the field, and goes on a slice path on snap, giving a split-zone or GY counter look to the backers on his side (#49, #24).
This action, along with the LG pull, pulls backers further into the box. The QB and HB work a play-action.
Meanwhile to the backside, the single WR begins his end-around on snap and receives the QB pitch.
TE #87 spins out of his slice steps and works back to the playside.
LT, C, RT all manage to work through the box to help seal for the end around.
All together, these actions leave the backers to the frontside too far inside, getting walled. It leaves only the CB to the outside trying to contain, and a single high safety keeping the play in front and slowing it down for pursuit. All against two linemen and a TE working to the 3rd level.
1&10, 12:12 2nd Quarter
HB pushes out pre-snap creating a 4x1, forcing Mike (#49) to widen with him.
The #3 WR to the trio (#13) curls up in the window between the widened Mike and the Will to the inside.
In their wildcard matchup against the Washington Football Team, the Tampa Bay Buccaneers utilized a series of plays featuring split zone actions, jet motions, and end-arounds to force the Washington defense to shift, generating a number of explosive play opportunities.
Using motions across the formation pre-snap, Tampa forces Washington's backers to push down and create mismatches or conflicts for the edge defenders.
Using split-zone actions (down-blocks and slices across from the TE), Tampa muddies and confuses the read for the secondary run-fitters (reading TE) and the backside DE (reading the down-block). This is followed with misdirection plays taking advantage of these muddied reads, attacking the edges of the formation.
Related plays not shown: 4 split zone run calls, 1 split zone play-action, and 1 jet sweep play action.
DETAILS
1&10, 1st drive of the game.
WR #81 (Antonio Brown) motions across the formation creates a 6 on 7 in the box, in favor of the offense.
This creates conflict for the slot defender, who has followed the motion and is now fitting the B gap from outside of the box.
One way teams alleviate this is by having the field DE shift tighter to the tackle and work into the B gap, or squeeze harder behind the down block to try and spill the kickout to the wider run defender.
1st&10, 2nd quarter
There is plenty of backfield action here, which quickly takes advantage of the defense.
HB swing action to the boundary, while the TE and #1 WR in the bunch are pulling around to the wide side of the field.
The O-line combined with the TE makes it look like split zone, which typically has the ball carrier hitting inside of the tackle box.
Reading split zone, the 9 defenders closest to the box take initial steps towards the center of the formation. DE #95 steps down hard behind the down block expecting to squeeze or get under any kickouts, and so the TE simply bypasses him and takes his block to the 3rd level unabated.
With the TE pulling, this creates a 4-on-4 box count to the playside. With the DE being skipped, the offense is gaining an extra blocker.
Worth noting: this play is ran while Chase Young is not on the field, to the side he typically defends.
2pt conversion, 2nd quarter
#81 jet motion across the formation causes backers to "pull the chain," leaving a defensive back to fit off of the DE on the edge.
DE #91 (Chase Young) jumps the B gap, forcing the runner to bounce outside to the free-hitting DB on the edge.
If the HB keeps his footing, this looks like it may be points on the board with the HB coming downhill fast on a DB in a 1-on-1 needing only 2 yards.
1st&10, 4th quarter
TE #84 goes on short return motion, followed by a pull giving a split-zone look. He then spins around in the backfield after a very short pull, and works back towards the wide side of the field.
Similar to the second clip, we can see all 10 players near the box step into the center of the formation, expecting split-zone thanks to the reads being created by the offense (OL down blocking, TE taking slicing action, and QB/HB fake).
Tampa had not run any two-man pulls this game, so the RG pulling up looks to me just like a way to replace the kick-out of the spinning TE, and seal out the backside pursuit of the disruptive Chase Young (#99).
The RT, C, and TE do a great job of working to the edge through the middle of the formation.
------------
Using frequent split-zone run calls, Tampa set up their misdirection plays to attack the edges of formations.
Using motions across the formation, Tampa created mismatches or tough fits for the Washington secondary.